
| Prev | Getting Started with Pervasive.SQL (Server edition) | Next |
Installing the Pervasive.SQL Server Components
You cannot install the NetWare server from the local console. You must install the Pervasive.SQL for NetWare server remotely from a Windows client machine on which you have administrative rights. If you will be installing Pervasive.SQL to multiple NetWare servers, you should use a different Windows client machine for each NetWare installation or you will lose the ability to uninstall the Pervasive.SQL server engines in the future.
Note
If the installation fails before the program copies any files to the target installation directory, the installation log file (install.log) can be found in the directory specified by the %TEMP% environment variable. This directory is often c:\windows\temp or c:\winnt\temp.
To install Pervasive.SQL on a NetWare server:


Note
Please see Installation Tips regarding the Pervasive.SQL V8 Setup Reboot Required dialog box.
The installation program begins its initial preparation. After the preparation completes, the Welcome screen appears.
- Click Next to proceed with the installation.
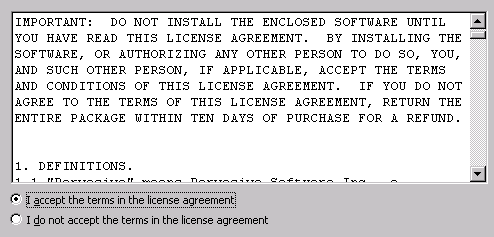
- Read the Software License Agreement.
- Click I accept the terms in the license agreement to accept the terms of the agreement and enable the Next button.
Figure 8-3 Pervasive Software's Software License Agreement
- Click Next.
- Type, or paste, a license key into the License field.
Figure 8-4 Applying the User Count License
Your Pervasive.SQL V8 Server is set to the number of users specified in the license key. When the update is complete, a dialog box informs you that you have increased your user count license to support that number of simultaneous users.
Note
If you do not yet have a license key or it is not with you at the moment, you can still continue with the installation by using an evaluation license. Click Next to evaluate the product for a trail period (ensure that EVAL is in the License field). The trial version license is valid for 30 days, then expires.
You may run the License Administrator utility at a later time to install a user count license key. The License Administrator utility is documented in Pervasive.SQL User's Guide in the section License Administrator .
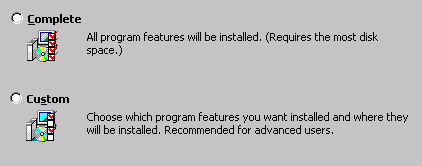
- Click on the Setup Type desired: Complete or Custom (the default is complete).
Figure 8-5 Setup Type Dialog Box
Note
For either setup type, Complete or Custom, the Pervasive.SQL online documentation and Pervasive System Analyzer (PSA) are installed locally. That is, on the Windows machine from which you are installing Pervasive.SQL Server for NetWare. The local components are installed to osdrive:\Program Files\Common Files\Pervasive Software Shared, where osdrive is the drive letter where your operating system is installed.
Complete Setup
The Complete installation, which is recommended for most users, takes default actions for operations performed during the installation.
The system components for the Pervasive.SQL Server engine are copied by default to SYS:\SYSTEM. You can specify a different location for the system components.
The non-system components are copied by default to SYS:\PVSW. You can select a different location for the non-system components.
The Complete server installation installs the following components to SYS:SYSTEM:
The Complete server installation installs the following non-system components to SYS:PVSW:
Custom Setup
The Custom installation is typically for advanced users. It allows you to specify the installation location, select the components to install, and determine the space requirements for the components.
If you choose Custom install, skip now to Custom Installation Path . At the end of that section you will return to this set of steps to continue the installation.
- Click Next.
- Specify the location for the system files. The default location is SYS:SYSTEM. If you want to change the default location, click Change, specify a location, then click OK.
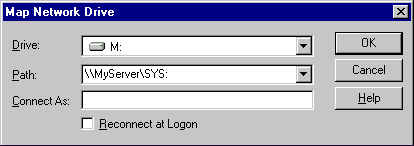
In the following example dialog, the SYS: volume is mapped to drive letter P.
Figure 8-6 Location for System Components (NetWare Server)
- Click Next.
- Specify the location for the non-system files (called the PVSW install folder).
The default location is SYS:PVSW. If you want to change the default location, click Change, specify a location, then click OK.
In the following example dialog, the SYS: volume is mapped to drive letter P.
Figure 8-7 Location for Non-system Components (NetWare Server)
- Click Next.
A dialog appears that informs you the installation program is ready to begin installing files. At this point, if you want, you may click Back to change or review any of the installation settings, or click Cancel to exit the installation program. After you click Install, you may still exit the installation, but you will be unable to change or review settings.
- Click Install to continue with the installation.
If you had a previous version of Pervasive.SQL on your system, Pervasive System Analyzer archives it before installing the current version of Pervasive.SQL.
A dialog appears that gives you a status of the installation process.
Figure 8-8 Installation Status Dialog Box (NetWare Server)
Installation actions include, but are not limited to, the following:
- Click Finish.
Caution
To avoid poor database performance on NetWare 5.1 and later, follow the instructions provided under Cache Allocation Size to increase Novell's factory setting for the database engine cache size.
- Start Pervasive.SQL on your NetWare machine by performing a DOWN command followed by a SERVER command on the NetWare server.
You must restart the NetWare server to load the new version of BTRIEVE.NLM. The NetWare operating system has dependencies on BTRIEVE.NLM,
- Your installation is complete.
Note
If you had any trouble with the installation, see Chapter 21, Troubleshooting After Installation.
| Prev Before You Begin |
Contents Up Check for Revisions | Next Custom Installation Path |