![]()
| Prev | Getting Started with Pervasive.SQL (Server edition) | Next |
Custom Installation Path
This section describes how to customize your installation of Pervasive.SQL client components. This topic continues a discussion from step 3 .
- Decide if you want to exclude utilities.
You may not exclude the minimum set of utilities. The minimum set includes the Password Utility and the following command-line interface (CLI) utilities: Maintenance, Rebuild, and License Administrator.
If you exclude utilities, you will be unable to configure your requester. The product is installed using all default values. In addition to no configuration ability, other restrictions apply. For example, no wizards will be available. We recommended that you include the utilities unless you are certain that you do not require the functionality provided by them.
The following utilities are not installed if you exclude them.
- Click on the Utilities' icon to display the installation choices.
Figure 15-12 Example of Installation Choices (Client Components)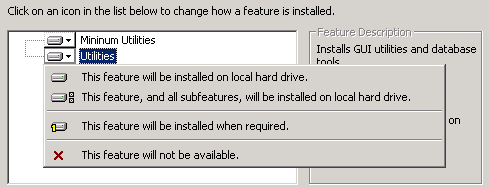
Note
The following choices are not used for Pervasive.SQL even if they appear in the list:
This feature will be installed to run from network.
This feature, and all subfeatures, will be installed to run from network.
This feature will be installed when required.
- Click on the desired installation choice.
- If desired, change the location where the Pervasive.SQL requester components are installed.
The default installation location is C:\PVSW, assuming the Windows system drive is C. To specify a different location for the installation, click Change, specify a location, then click OK.
You may select only one installation location for the entire product. The Change button is disabled The Change button is disabled for a feature if you choose not to install that feature.
- If desired, click on a feature to check the amount of storage space it requires.
The space required appears on the right:
Figure 15-13 Location of Space Required Values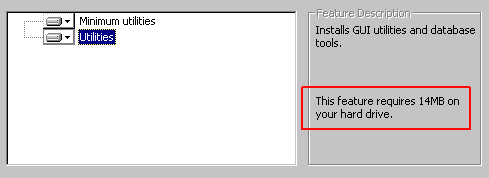
- If desired, check the amount of storage space available on the physical drives.
Click on a feature, then click Space. The resulting dialog shows you by storage volume, the total disk space, the available disk space, the space required for the feature, and difference between the available space and space required. Click OK after you finish checking storage capacity.
A dialog appears that informs you the installation program is ready to begin installing files. At this point, if you want, you may click Back to change or review any of the installation settings, or click Cancel to exit the installation program. After you click Install, you may still exit the installation, but you will be unable to change or review settings.
The Custom path rejoins the Complete installation path at this point. Continue with Step 5 .
| Prev Installing the Pervasive.SQL Client Components |
Contents Up Check for Revisions | Next Where To Go From Here |