

| Prev | User's Guide | Next |
PSA Tasks
The following are the primary tasks for PSA:
Analyze and Archive Tasks
Restore Archive Tasks
Delete Components or Archives Tasks
- To specify the location at which you wish to delete components or archives
- To specify what to delete on a Windows machine
- To specify what to delete on a NetWare machine
View Components Tasks
- To select options for the View Components module
- To add a component to the search list
- To add a location to the search list
- To understand the results of your components view
Test Active Installation Tasks
- To test your network
- To specify advanced settings for network test
- To understand your network test results
- To test the transactional database engine
- To understand your transactional database engine test results
- To test the relational database engine
- To understand your relational database engine test results
Other Tasks
- To specify a different location for the PSA log file
- To view the log file at the completion of Pervasive System Analyzer tests
- To determine what version of PSA you are running
Analyze and Archive Tasks
To choose the search method for PSA
- Select Analyze System or Archive Components as shown in Figure 7-1 .
- Select the search method you want the Pervasive System Analyzer (PSA) to use.
- Quick Search - This method searches the path names included in your user and system's PATH environment variable.
- Advanced Search - This method searches locations you specify in the Look in drop-down list box. Use the ... button to accurately select the directory location you want PSA to search. Select the Include subfolders check box to search each subfolder in the chosen directory.
- Click Next to start the analysis.
- The analysis may take several minutes. When it is complete, see To archive components found by PSA
To archive components found by PSA
- PSA displays the results of your search method (To choose the search method for PSA ). If Pervasive components were found on your system, they are displayed on the results screen and are grouped by major release.
- If you choose to archive components, the archives can be restored at a later time, if needed, using the Restore Archives option in PSA.
If you archive all files under a major release (for example Pervasive.SQL 2000), then all the existing Pervasive components for that release and its configuration settings are archived.
If you select a partial set of files from a release, then those files are archived but the configuration settings for that release are not copied with that archive.
Note
During an install of a Pervasive.SQL engine, previous versions of the product are automatically archived for you so that your install can complete without component conflicts.
- After selecting what files to archive, select a local drive where you would like to store the archive and click Next to start the archival process.
Restore Archive Tasks
To select the drive that contains archives
- Using the drop-down list, select the archive drive that contains the archives you would like to restore.
- Click Next to display the archives list.
- See To restore archived files .
- PSA displays the archived Pervasive components found on your selected archive drive that are available for restoration. (See To select the drive that contains archives ). The archives are grouped by major release on the results screen.
- Choose which archives you want to restore by selecting the appropriate entries in the results list. Clear the selection of any archive that you do not want to be restored. To understand the restrictions on restoring archives, review Notes on Restoring Archives before making your selections.
- Click Next to restore your selections.
If any of the files that are to be restored exist in the target directory, PSA displays a confirmation dialog before overwriting the files.
Notes on Restoring Archives
This section documents rules with regards to restoring archives.
Restoring When a Windows Server Engine is Present
When there is an existing Pervasive.SQL server engine of any version currently on your system, you cannot restore another product to that system. In this scenario, PSA displays a message that the current server engine version must be archived or uninstalled before restoring any other version can occur.
Restoring to a Remote NetWare Server
When you restore an archive to a remote NetWare server, you overwrite the Pervasive.SQL version currently on that server. PSA warns you of this before restoring to a NetWare server and allows you to cancel the operation if necessary.
Restoring Workgroup Engines and Pervasive.SQL Clients
You can restore an archive of a Workgroup engine or a Pervasive.SQL client, even if another version currently exists on your machine. However, you cannot restore the archive of either a Workgroup engine or client to a folder where another version currently exists.
You also cannot restore a Workgroup engine or client to a machine where a current Pervasive.SQL Server engine exists.
Delete Components or Archives Tasks
To specify the location at which you wish to delete components or archives
- Select Delete Components or Archives as shown in Figure 7-1 .
- Specify the location from where you want to delete Pervasive components.
Note
If this selection is disabled, then your Windows machine has no mapped drives to NetWare volumes. To delete Pervasive components on a remote NetWare server, map a drive to the NetWare volume where Pervasive components are installed.
- Click Next to continue.
- If you are deleting from a Windows machine, see To specify what to delete on a Windows machine . If you are deleting from a NetWare machine, see To specify what to delete on a NetWare machine
To specify what to delete on a Windows machine
- Select the items you want to delete. You can select to delete Pervasive.SQL components and registry settings or Pervasive archives.
Permanently deletes all Pervasive.SQL, DataExchange, and AuditMaster files found in PATH. Deletes <drive>:\pvsw and <drive>:\bti folders and all of their contents. Deletes product registry settings, system environment variables (namely CLASSPATH, PATH and Pervasive_Path), icons, and backup (*.bck) directories created by the Pervasive installation setup program. Note: This option does not delete Pervasive Tango or archives created by PSA.
Permanently deletes all archives created by PSA.
Note
Pervasive.SQL includes the following products:
To specify what to delete on a NetWare machine
- Select the items you want to delete. You can select to delete Pervasive.SQL components and registry settings or Pervasive archives.
Permanently deletes all Btrieve and Pervasive.SQL files found in the SYSTEM and ODBC folders on the specified NetWare volume. Deletes <mapped drive>:\pvsw, <mapped drive>:\bti, and <mapped drive>:\pvsw7.bck folders and all of their contents. Deletes backup (*.bck) directories created by the Pervasive installation setup program. Note: This option does not delete Pervasive Tango or archives created by PSA.
Caution
Some NetWare system modules may not load correctly if the Btrieve or Pervasive.SQL components are deleted. To correct this, you must either reinstall Btrieve or Pervasive.SQL after you have deleted these components.
Permanently deletes all archives created by PSA.
Note
Pervasive.SQL includes the following products:
View Components Tasks
To select options for the View Components module
- Select View Loaded Pervasive Modules as shown in Figure 7-1 .
- The selections by default resemble Figure 7-2 . By default, PSA displays the following components
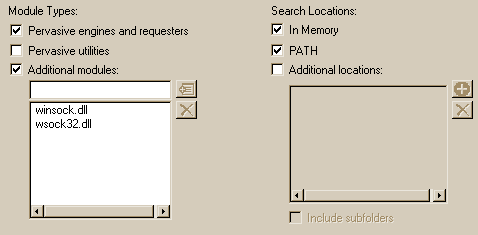
- If you check In Memory, PSA searches for all Pervasive components loaded in memory, regardless of whether they are located in the PATH or other specified locations. If you want to add components to the search list, see To add a component to the search list . If you want to add more paths to the search locations, see To add a location to the search list .
Otherwise, continue with this procedure.
- Click Next to search for and display the components results list. See To understand the results of your components view .
To add a component to the search list
- Referencing Figure 7-2 , ensure that Additional modules checkbox is selected.

- Enter the base component filename (without a drive letter or path) in the text box immediately below the Additional modules checkbox. For example, MYFILE.DLL
- Click the Add Component button.

- If the component you added is not in the path, add the path to the searched locations using the To add a location to the search list task .
- Return to Step 4 of the To select options for the View Components module task
To add a location to the search list
- Referencing Figure 7-2 , ensure that the Additional locations checkbox is selected.


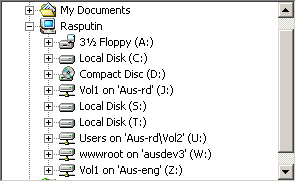
- Click OK to add the location.
- If you want all directories below your location to be searched as well, select the Include subfolders checkbox as shown in Figure 7-2 .

- Return to Step 4 of the To select options for the View Components module task
To understand the results of your components view
- A grid resembling Figure 7-3 displays showing the components found as a result of the task To select options for the View Components module .
Figure 7-3 View Modules Results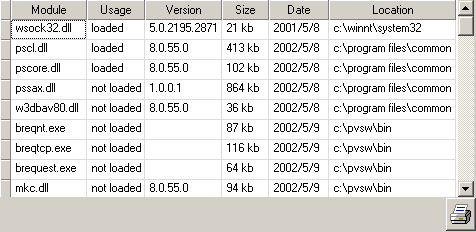
- The grid contains the following information:
- If files of the same name are detected, the multiple occurrences will be marked with an icon on the left side and highlighted in the list as shown in Figure 7-4. If multiple occurrences of a file are found, it does not necessarily represent a problem with your configuration. It is an informational message that you can use if you are troubleshooting an issue with components.

Figure 7-4 Multiple Occurrences of a Component Found
- When you see multiple occurrences of a component, you may want to adjust the display so that the occurrences sort together in the list. To do this, click Module at the top of the display and then scroll the resulting list until the modules with the icon display appear. You should then see the multiple modules on successive rows as shown in Figure 7-5.
Figure 7-5 Sorting Multiple Occurrences of a Component
- After you have sorted the modules by name, you can determine whether the multiple modules have the same version, and which ones are loaded in memory. If you see two Pervasive components both marked with the same version such as 8.0.xxx.0, you may want to check to see which is loaded in memory and that its location is where you expect.
Test Active Installation Tasks
Pervasive System Analyzer can test your system in these ways:
- To test your network
- To specify advanced settings for network test
- To understand your network test results
- To test the transactional database engine
- To understand your transactional database engine test results
- To test the relational database engine
- To understand your relational database engine test results
- Select Test Network as shown in Figure 7-1 .
- Enter the machine name or TCP/IP address of the machine you wish to test as shown in Figure 7-6. The machine can be the machine where you are currently located or a remote machine.
Figure 7-6 Selecting the Machine on which to Run a Network Test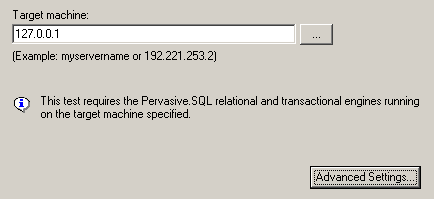
- If you want to control how the tests are run, click Advanced Settings and see To specify advanced settings for network test . Otherwise, continue with this procedure.
- Click Next to start the test.
- PSA runs a series of tests and displays the results. See To understand your network test results .
To specify advanced settings for network test
- By default, PSA uses the first available protocol. You can use this screen to force PSA to use one or more protocols. To force PSA to use protocols, select the Use Only These Protocols button.
- Use the checkboxes to select the protocols you want PSA to test as shown in Figure 7-7.
Note
The NetBIOS protocol is not supported on Pervasive.SQL Server engines. The SPX protocol is not supported on Pervasive.SQL Workgroup engines.
Figure 7-7 Selecting Protocols for Network Tests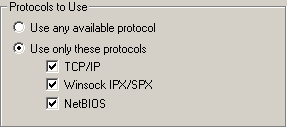
- After successfully connecting using any protocol, PSA will send one or more stress test messages to ensure that the connectivity is sound. Specify the number of stress test messages by entering the number in the appropriate field as shown in Figure 7-8. The default number is 75, and while you can specify a maximum of 2,147,483,647 messages, a much smaller number of messages should be sufficient in most situations to ensure that your network communication is reliable.
Figure 7-8 Selecting Number of Stress Test Messages
- Click OK to save the changes.
- Return to Step 4 of the To test your network task .
To understand your network test results
- PSA runs several network tests and displays troubleshooting suggestions when problems occur.
- If you have a successful test, the results should look like Figure 7-9.
Figure 7-9 Successful Network Test Screen
- If your test results in issues to be resolved, then the PSA window should list the issues along with tips on how to resolve it. Read the information contained in the window, scrolling if necessary, to understand what steps need to be taken. The tips are also recorded in the PSA log file.
To test the transactional database engine
- Select whether or not you wish to run the Transactional Engine Test. Accepting the default response runs the test. This test runs a series of Btrieve operations to simulate your requester performing actual Btrieve database work.
- Select or enter the path name for the samples directory on the database engine server. You can browse to the samples directory by clicking the button to the right of the text field.

If these steps are successful, you have a working Btrieve requester that has connectivity to the server.
To understand your transactional database engine test results
A dialog box displays during the tests to show progress.
The dialog box displays the Transactional Engine test results.
Note: The progress bar completes for each transactional operation that runs. PSA displays a check mark if the operation is successful and an "x" for every operation that fails.
To test the relational database engine
- Select whether or not you wish to run the Relational Engine Test. Accepting the default response runs the tests. This verifies that the SQL Connection Manager on the remote Pervasive.SQL Server Engine is communicating properly.
- Enter the Server Name where the DSN resides. You can browse to find the server name by clicking the button to the right of the server name field.

- Enter the Server Data Source Name (DSN) for the data source you would like to test.
- Select the operations you want to perform against the relational engine.
If these steps are successful, you have a working Relational Interface requester that has connectivity to the server.
To understand your relational database engine test results
A dialog box displays during the tests to show progress.
This dialog box displays the Relational Engine Test results.
Note
The progress bar completes for each relational operation that runs. PSA displays a check mark if the operation is successful and an "x" for every operation that fails.
Other Tasks
To specify a different location for the PSA log file
- On the main dialog page, enter the path to your PSA log file in the provided box.
Figure 7-10 Specifying the PSA Log File Name and Location
- If you want to search for the directory instead, click ... to the right of the dialog box.
Figure 7-11 Searching for PSA Log File Path
To view the log file at the completion of Pervasive System Analyzer tests
- Click View Log File to display the PSA log file you specified for analysis details.
Figure 7-12 Viewing the PSA Log File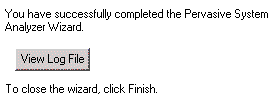
- A summary of the tasks PSA completed is listed for you. Please restart your computer if you are instructed to do so
To determine what version of PSA you are running
- Using Windows Explorer or My Computer, browse to the location of your PSA installation.
The drive location will be the same as the location of your Windows operating system. Assuming Windows is installed on C, the PSA installation folder would be:
- Find
psawizrd.exein the folder.- Right-click on the icon for
psawizrd.exeand select Properties.- Click the Version tab and select the Product Version item.
- Read the version on the right column as shown in Figure 7-13.
Figure 7-13 Viewing the PSA Version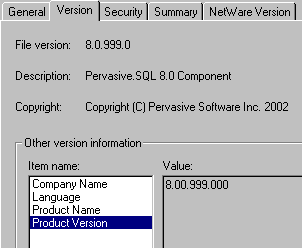
| Prev PSA GUI Visual Reference |
Contents Up Check for Revisions | Next Linux Supplementary Documentation |