

| Prev | User's Guide | Next |
Setting Up Client Access
To make a Pervasive Client able to access a remote Pervasive.SQL database
This procedure explains how to create a Client DSN with the PCC. Client DSNs are used only on client workstations when connecting to a database engine.
Note
If you have not done so already, please review Prerequisites to Setting up Database Access before proceeding.
- Open Pervasive Control Center (PCC):
Start4Programs4Pervasive.SQL V84Control Center- Double-click on Pervasive.SQL Engines.
The PCC Namespace contains a list of database engines that have been registered.
If you do not see the name of the database engine you want to connect to, you must register the remote engine with PCC. To do so, right-click on Pervasive.SQL Engines then click Register New Engine.
Figure 2-22 Registering a New Engine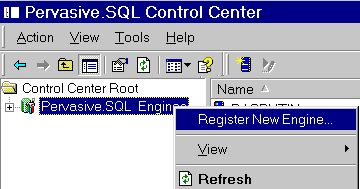
A dialog box is displayed that allows you to choose the machine name where the Pervasive.SQL engine resides.
Figure 2-23 Choosing a Computer Name
- Do one of the following:
- Type the machine name in the Computer name field and click OK.
- If you are unsure of the machine name, click the button located to the right of the name field and browse from the Network list that appears. Click on the desired computer name, then click OK.
Figure 2-24 Choosing a Computer Name from a Network List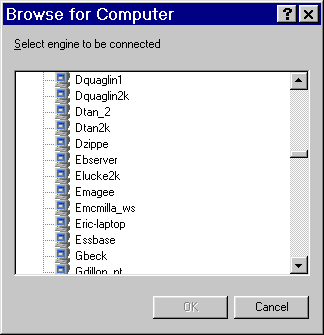
- Back in the main screen of PCC, double-click the icon representing the machine you are working with. Right-click the Databases folder associated with the machine you have selected. Click New Database to start the Create Database Wizard.
Figure 2-25 Create Database Wizard-Client DSN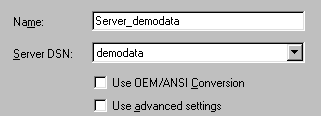
- In the Name field, type a descriptive name for the DSN. This name will be displayed in the ODBC Administrator and to users attempting to connect to ODBC data sources. The maximum length is 32 characters.
In the Server DSN field, select the Engine DSN on the machine that you want to associate with the Client DSN you are creating.
If you click Use advanced settings, see Client DSN Options in Advanced Operations Guide for a discussion of the settings.
- Click Next to display the final confirmation screen.
Figure 2-26 Create Database Wizard-Client DSN Confirmation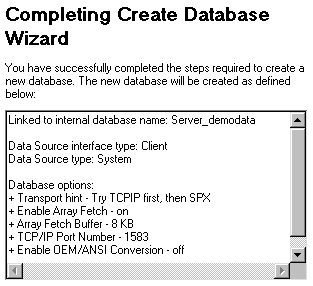
Note
The Client DSN you have just created does not appear in PCC. It appears only in the ODBC Administrator as a System DSN. It also appears in the DSN list presented when local applications attempt to connect to ODBC data sources. Once you have created a Client DSN, you can remove or rename it from the ODBC Administrator, using the Remove or Configure buttons.
Tip
You can set the option to have Client DSNs appear in PCC by right-clicking on the database engine is the list and selecting View4Show Client Databases. Once you have set this option, you can remove or configure it using PCC.
Setting Up a Client DSN Using the ODBC Administrator
- Open the ODBC Administrator (from the Start menu, select Programs4Pervasive.SQL V84Other Utilities4ODBC Administrator).
- Click on the System DSN tab, then on Add.
Note
Pervasive.SQL does not support File DSNs. You must use User or System DSNs. System DSNs are generally preferred, because they are available to all users on a given computer.
The following dialog box appears:
Figure 2-27 Pervasive ODBC Client DSN Setup Screen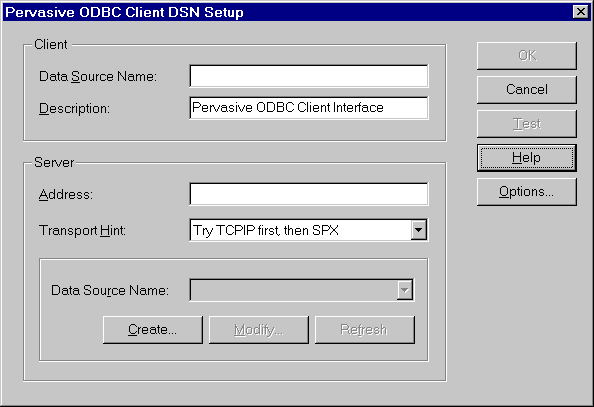
- In the Client section, type in a DSN (with a maximum length of 32 characters) for the data source to which you wish to set up a connection. This DSN will help you identify the data source. It will be visible only on the current machine.
- Type a description of the data source, if desired (with a maximum length of 80 characters).
- If you want to enable OEM/ANSI conversion, click the Options button and make your selection in the dialog box that appears.
Figure 2-28 Pervasive ODBC Client DSN Options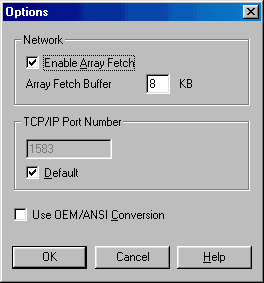
Do not modify the Network settings or TCP/IP Port Number unless you have first reviewed the information about these Client DSN options in Advanced Operations Guide.
- Click OK to return to the Pervasive ODBC Client DSN Setup dialog box.
Figure 2-29 Pervasive ODBC Client DSN Setup Screen #2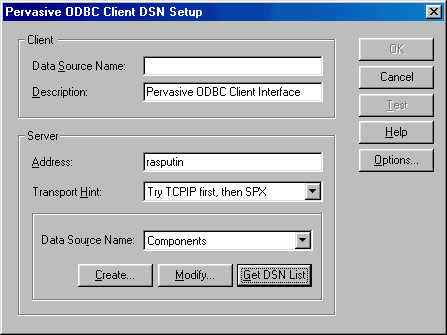
- In the Server area, type in the host name of the computer where the data source resides. You can enter a machine name, TCP/IP address, or an IPX/SPX MAC address.
- To use an existing database on the server, click the Get DSN List button and select the desired DSN from the drop-down list. In the Server area, Data Source Name refers to an Engine DSN on the server computer.
If no databases appear in the drop-down list, either you selected the wrong server, or you need to have your system administrator name the server databases and create Engine DSNs for each of them before you can access them.
Setting Up a Client DSN on a Linux Workstation
While it is possible to access a database from a Linux server by a Linux client, there are no Pervasive.SQL utilities (except
dsnadd) that can be used on the client. A Linux client configuration would be used for independent applications, such as web applications.To add a client data source, execute the following command:
dsnadd -dsn=myDSN-desc=datasource-host=psqlhost-sdsn=svDSNmyDSN is a name you want to assign to the new Client DSN.
datasource is any string to describe the data source.
psqlhost is the name of the network host where your Pervasive.SQL database resides.
svDSN is the name of the Engine DSN on the Pervasive.SQL host.
Note
The datasource on the server must be named first.
For example, to create a Client DSN named TEST on host NewDev, where the Engine DSN name for the database is NewTest, type
dsnadd -dsn=TEST -host=NewDev -sdsn=NewTestFor more information about the
dsnaddutility, please see Getting Started with Pervasive.SQL (Server edition).
| Prev Setting Up Database Access on a Linux Server |
Contents Up Check for Revisions | Next Accessing Data via ODBC From Other Applications |