

| Prev | What's New in Pervasive.SQL V8.5 | Next |
Configuring Security
Once you have gathered the necessary information and decided on a security scheme and a database to use, you can follow these instructions to set up security.
IMPORTANT: This section is only needed if you wish to use Mixed or Database security. Pervasive.SQL uses Classic security automatically unless you change it to a different policy.
Note
To set up security, you must have administrative permissions on the operating system where the database engine is located, or you must be logged in to the computer as a user who is a member of the Pervasive_Admin security group.
You must start by either creating a new database or selecting an existing database to use with your Btrieve files. Unless you have a specific need to create a new database or use your own existing database, Pervasive recommends using the pre-defined DefaultDB database.
Regardless of whether you wish to use an existing database or create a new one, you should use Pervasive Control Center (PCC) to get started.
This section contains the following procedures:
- To start Pervasive Control Center
- To create a new database for use with your Btrieve files
- To use an existing database, including the pre-defined DefaultDB, with your Btrieve files
- To Change Security Policy for a Database
To start Pervasive Control Center
- Click Start and select Programs 4 Pervasive.SQL 4 Control Center.
- In the left-hand pane of PCC, double-click Pervasive.SQL Engines. In the list of database engines that appears, locate the database engine you wish to access.
Note
If you do not see the database engine you wish to access, you must register it with PCC. To do so, click the Action menu and choose Register New Engine. In the dialog that appears, specify or choose the computer where the desired database engine is located. Click OK when you are finished.
- Double-click the icon representing the database engine you wish to access. Continue by selecting one of the procedures detailed below.
To create a new database for use with your Btrieve files
- From the Action menu of PCC, choose New Database.
- The Create Database Wizard appears, as shown in Figure 4-1. Enter a name for the database, specify a location for the database definitions, and check Use Advanced Settings. Click Next.
Figure 4-1 Create Database Wizard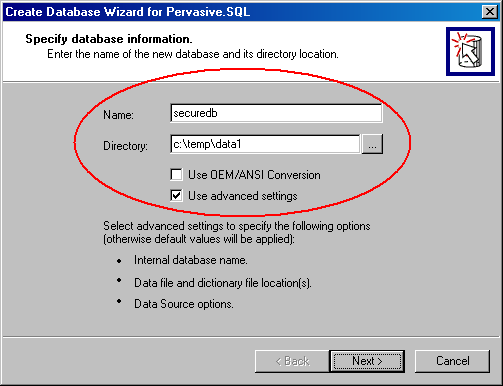
- In the next screen, shown in Figure 4-2, keep the default values shown unless you are certain you require different values. Click the Create button.
Figure 4-2 Specify DSN Attributes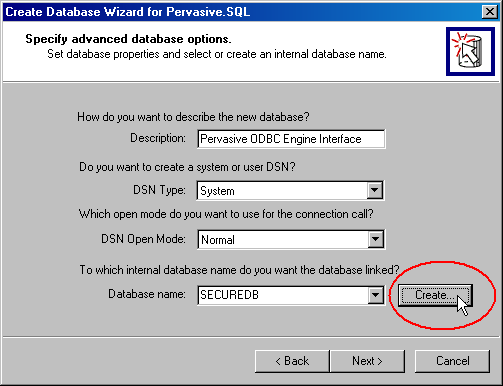
- In the next screen, shown in Figure 4-3, click the plus button
. In the dialog that appears, enter or select a directory containing your Btrieve files. If all your files are in sub-directories under one particular directory, you need only add that one top-level directory. Otherwise, repeat this step for each directory you need to add until you have added all the directories containing Btrieve files.
Caution
You may be tempted to choose your new Security Policy now, but do not-you will lock out all your users until you define their database rights. You must come back and choose your security policy in a later step, after you have granted database rights to the users.
Figure 4-3 Data File Locations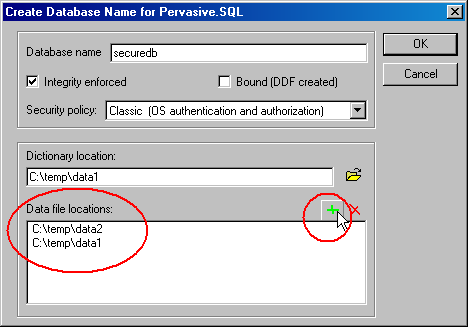
- You should now be back in the screen shown in Figure 4-2. Click Next to display the confirmation screen.
- In the confirmation screen, review the information and click Finish, or click Back to change your inputs.
Now you are ready to turn on security, as detailed in To turn security on for a Database .
To use an existing database, including the pre-defined DefaultDB, with your Btrieve files
- Within PCC, locate the database engine you wish to access. If you do not see an icon named Configuration under your selected database engine, double-click on that database engine to expose the Configuration icon.
- Right-click on Configuration and select Maintain Named Databases. Optionally, you may click on Configuration and then click the Action menu and select Maintain Named Databases. You will see the dialog shown in Figure 4-4.
Click on the database you wish to use with your Btrieve files, such as DefaultDB.
Figure 4-4 Maintain Named Databases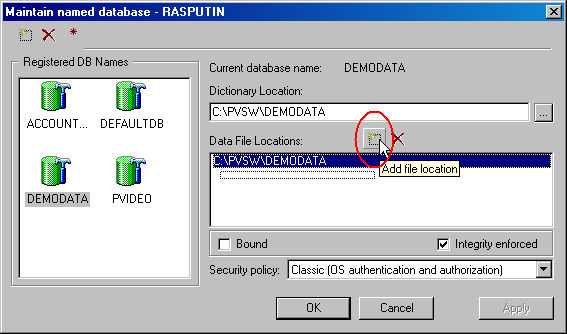
- Click the Add Data File Location button, circled in Figure 4-4. Enter or select a directory containing your Btrieve files. If all your files are in sub-directories under one particular directory, you need only add that one top-level directory. Otherwise, repeat this step for each directory you need to add until you have added all the directories containing Btrieve files.
Caution
You may be tempted to choose your new Security Policy now, but do not-you will lock out all your users until you define their database rights. You must come back and choose your security policy in a later step, after you have granted database rights to the users.
- If you are prompted to confirm your changes, click OK again.
Now you are ready to turn on security, as detailed in To turn security on for a Database .
To turn security on for a Database
This procedure explains how to turn security on for a given database. You must be logged into the computer as an administrator or as a member of the Pervasive_Admin operating system security group.
Caution
Turning on security will prevent all users from accessing the database unless they login to it using a valid database username and password. Usernames and passwords cannot be set up until security is turned on, so the database will be inaccessible to each user for the period of time until you have set up a user account for that user.
- In PCC, right-click on the database you wish to secure, and choose Properties.
- In the dialog that appears, click on the Security tab. Enter the password you wish to use for the Master user, and enter it again to confirm. Click OK.
- The database is now secure, and you are logged in as the Master user.
For instructions on creating database user accounts, see Creating Database Users and Privileges .
To turn security off for a Database
This procedure explains how to turn security off for a given database. To turn security off, you must be logged into the database as the Master user.
Caution
Turning off security will allow all operating system users to access the database. Turning off security also erases all database user accounts and privileges. If you turn security back on, you must re-create all users and privileges.
- In PCC, right-click on the database you wish to make unsecure, and choose Properties.
- In the dialog that appears, click on the Security tab. Click the check box labeled Disable security. Click OK. The database no longer enforces security.
To grant the same rights to all users
To avoid setting up and maintaining individual user accounts, one approach to configuring Btrieve security is to grant the same rights to all authorized users. You must be logged in as Master to perform this procedure.
- In PCC, right-click on the database you want to work with (usually DefaultDB). From the pop-up menu, choose Tasks 4 Execute SQL Query to start up SQL Data Manager.
If prompted to login, enter the user name Master and the master password you created when you turned on security.
- In the SQL Data Manager window that appears, enter the following SQL statement:
Rights are additive, so you can specify a combination of rights by issuing more than one statement. For example, if you want all users to be able to read and update records only, then you can issue two statements:
GRANT SELECT ON * TO PUBLICandGRANT UPDATE ON * TO PUBLIC.These rights are effective immediately upon execution of the statement.
Note
If you are in the process of securing your Btrieve files, you must now change your Btrieve Security policy. For instructions on how to perform this task, see To Change Security Policy for a Database .
To Change Security Policy for a Database
This section describes how to change the security policy for a given database.
Caution
Changing security policy for a database may prevent current users from accessing the database, if security is turned on and the given users do not have equivalent user accounts and rights under the new security policy.
- Within PCC, locate the database engine you wish to access. If you do not see an icon named Configuration under your selected database engine, double-click on that database engine to explose the Configuration icon.
- Right-click on Configuration and select Maintain Named Databases. Optionally, you may click on Configuration and then click the Action menu and select Maintain Named Databases. You will see the dialog shown in Figure 4-5.
Click on the database for which you wish to change the security policy, such as DefaultDB.
Figure 4-5 Maintain Named Databases - Changing Security Policy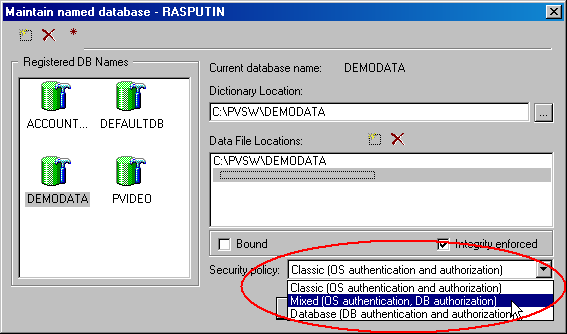
- In the Security Policy box, choose which security policy you wish to use (Mixed or Database). Then click OK.
Caution
If your database has security turned on and you change from Classic security policy to Mixed or Database, all users are prevented from accessing the database until you create database user accounts and privileges for them.
| Prev Btrieve Security Quick Start |
Contents Up Check for Revisions | Next Creating Database Users and Privileges |