

| Prev | Advanced Operations Guide | Next |
Microsoft Cluster Service
Microsoft Cluster Service is supported by the Pervasive.SQL V8 Server engine on the following configurations:
This section assumes that you are familiar with the installation and configuration of Cluster Service and need only the information required to add the Pervasive.SQL V8 services to a Cluster Service group.
If you are not familiar with Cluster Service technology, please refer to the Microsoft documentation for how to install Cluster Service, verify it is working correctly, and perform tasks with it. You may also find the following links beneficial:
- http://www.microsoft.com/windows2000/technologies/clustering/default.asp
- http://www.microsoft.com/technet/treeview/default.asp?url=/technet/prodtechnol/WindowsNetServer/proddocs/SCCon_BP.asp
- http://www.microsoft.com/ntserver/ProductInfo/Enterprise/clustering/ClustArchit.asp.
How to Proceed
This section is organized in the manner in which you should proceed to add the Pervasive.SQL services to a cluster group. That is, this section gives you the following suggested approach:
- Verify that Cluster Service is functioning correctly
- Add a cluster group for Pervasive.SQL
- Install Pervasive.SQL on the cluster nodes
- Add the Pervasive.SQL resources to the cluster group
- Configure the engines with Pervasive Control Center
- Establish the Pervasive.SQL database(s) on the cluster shared disk and verify connection from a Pervasive.SQL client.
Verify Cluster Service Functioning Correctly
It is essential that Cluster Service be functioning correctly before you add the Pervasive.SQL services to a cluster group. Refer to the Microsoft documentation for how to install Cluster Service, verify it is working correctly, and perform tasks with it.
We recommend that you select servers and disk subsystems from the Microsoft hardware compatibility list (HCL) for clusters.
Note
If Cluster Service is not set up properly, you will be unable to get your Pervasive.SQL resources to work properly.
Verify Network Client Communication
Before you add Pervasive.SQL to a cluster environment, we recommend that you verify network client communication with the cluster shared disk. A network client must be able to communicate with a cluster shared disk before and after a failure of a cluster node (failover). The following task lets you verify this.
To verify network client communication and cluster failover
- Connect a drive on a client computer to the shared disk subsystem. (This step assumes that you are using a computer on which a Pervasive.SQL requester is, or will be, running.)
From a command prompt on a client computer, execute the following command:
net use X: \\WIN2K-Cluster\Gdrive
This example connects drive "X" on a workstation to the "G" drive on the shared disk subsystem "WIN2K-Cluster." "WIN2K-Cluster" is the Network Name. "Gdrive" is the File Share.
- Verify that you can execute a command on the connected drive. For example, switch to the drive and display a directory with the
dircommand:- Verify that you can connect to the IP address of the shared disk subsystem. From a command prompt, execute the following command: ping Network Name. For example, ping WIN2K-Cluster.
If the command returns something like Reply from IP address, then you can connect to the IP address. For example, the following reply shows a successful connection:
Reply from 172.99.99.35: bytes=32 time<10ms TTL=128
Check that the IP address in the reply is the correct address of the shared disk subsystem.
- In the Cluster Administrator, right-click on the Network Name, then click Initiate Failure. Repeat this action until a failure occurs. The number of times you must repeat the action depends on the threshold setting.
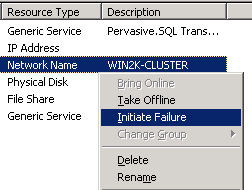
This fails the node currently controlling the shared disk of the cluster. A surviving node in the cluster becomes active and assumes control of the shared disk.
Note
Ensure that the failover occurred and that a surviving node is now controlling the shared disk. If you cannot initiate a failure, then your clustering environment may not be set up correctly and you will be unable to get your Pervasive.SQL resources to work properly.
- On the client computer used for step 1, verify that you can still execute a command on the connected drive. For example, display a directory with the dir command.
The cluster is functioning correctly if you can execute a command on the shared disk subsystem from a client computer before and after a failure. If you cannot, check the setup of the Cluster Service and the resources.
Add a Cluster Group for Pervasive.SQL
Your next task is to create a cluster group to which you will later add the Pervasive.SQL resources. You create a cluster group to it with the Microsoft Cluster Administrator.
Please refer to the Microsoft Cluster Service documentation for how to add a cluster group. The steps to add the Pervasive.SQL resources to a cluster group are explained in Add Pervasive.SQL Services to Cluster Group .
All resources within a cluster group fail together. That is, if one resource within a group fails on a node, the remaining resources are taken offline. All resources within the group are then transferred to a surviving node and brought back online. For this reason, we suggest that you create a separate cluster group for Pervasive.SQL. This is not mandatory, but is a good administrative method.
At a minimum, ensure that a cluster group for Pervasive.SQL contains the following resources.
- IP Address. This is the IP address of the shared disk subsystem. The Pervasive.SQL requesters connect to this IP address.
- Network Name. This is the name of the shared disk subsystem that users see on a network. The name is of your choosing. For example, you may want to name the shared disk subsystem "Pervasive.SQL Cluster" or something to that effect.
- Physical Disk. This is the disk subsystem that contains the Pervasive.SQL database. The cluster nodes share this disk, but only one node at a time controls the disk.
- File Share. This is the share point to which users can connect. Your database files reside in one or more directories on the file share.
Failback
In addition to the required minimum resources (IP Address, Network Name, Physical Disk, and File Share), you may want to enable failback for the group. Failback is a feature of clustering that specifies a preferred controlling node within the cluster.
For example, suppose your cluster contains two nodes, Server A, the preferred controlling node, and Server B. If Server A fails, Server B assumes control. When Server A comes back online, control passes back to it automatically. This automatic transfer of control is referred to as failback (clustering automatically "fails back" to the preferred node).
You specify failback on the properties dialog of the group name.
Note
When the cluster node fails back to the preferred server, a Pervasive.SQL client loses connection with the database engine. No automatic reconnection occurs. Your application must reconnect the client to the Pervasive.SQL database or you must restart the application. This applies even if Enable Auto Reconnect is turned on in the PCC.
Pervasive.SQL does not maintain the transaction state when the failback occurs. The transaction state does not transfer to the preferred server. Transactions are automatically rolled back to the state before the transaction began.
Install Pervasive.SQL on the Cluster Nodes
You install Pervasive.SQL V8 Server on each cluster node. Choose identical options for each installations. See Installing Pervasive.SQL with No Previous Installation in Getting Started with Pervasive.SQL (Server edition).
Do not install Pervasive.SQL on the cluster shared disk. The shared disk is where the Pervasive.SQL database(s) reside.
The Pervasive.SQL transactional and relational services typically run under the Local System Account. Depending on the settings for your domain permissions, the Local System Account may lack authority for certain actions pertaining to Pervasive.SQL, such as installing the requesters from a cluster node. Check the domain permissions for your cluster node accounts if you encounter problems installing the Pervasive.SQL products.
After installation, both the transactional and relational services are set to start automatically when the operating system starts. With clustering, however, the Cluster Administrator controls the starting and stopping (bringing online or offline) of the services. Be aware that, once you add the Pervasive.SQL services to a cluster group, the Cluster Administrator changes the service settings from automatic to manual.
If you add both the transactional and relational service to your cluster group, you do not need to take any action concerning the service settings. (Cluster Service sets both to manual.) The transactional service is always required in your cluster. The relational service is optional. If your application(s) requires the relational engine of Pervasive.SQL, you must also add the relational service to the cluster group.
Note, however, that if you add only the transactional service to the cluster then you must change the startup settings for the relational service. (The startup settings established when you installed Pervasive.SQL by running the installation program.) See To change the startup setting for the relational service .
Add Pervasive.SQL Services to Cluster Group
Your next task is to add the Pervasive.SQL services to the cluster group.
To add the Pervasive.SQL transactional service to a cluster group
The transactional service of Pervasive.SQL is always required in a cluster group. Perform this task on only one node in the cluster. All other nodes in your cluster share the information.
- Ensure that Pervasive.SQL Server is installed on each cluster node and that the correct administrative permissions are set on each node. See Install Pervasive.SQL on the Cluster Nodes .
- In the Microsoft Cluster Administrator, right-click on the desired cluster group name, then click New4Resource.
- On the New Resources dialog, type in a name for the resource. The name is used only for display purposes within Cluster Administrator. Optionally, type in a description for the resource.
- Click the list for Resource type then click Generic Service.
- Click the list for Group then click the desired group.
- Do not check the option Run this resource in a separate Resource Monitor.
The information should look something like the following example:
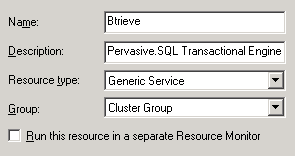
- Click Next. The Possible Owners dialog appears.
- Specify the nodes that can function as possible owners for the resource. (Add the nodes to the list of possible owners.)
- Click Next. The Dependencies dialog appears.
- Add the resources that must be brought online first. That is, the resources on which the new resource depends. Add the following dependences to the list of resource dependences:
- Click Next. The Generic Services Parameters dialog appears.
- For Service name, type in Pervasive.SQL (transactional).
- Leave the Start parameters blank.
- Click the option Use Network Name for computer name.
The information must be the following:

Note
Ensure that you check the option Use Network name for computer name. This option allows the Pervasive.SQL transactional engine to open files directly on the shared disk, which improves performance.
- Click Next. The Registry Replication dialog appears.
- Click Add. The Registry Key dialog appears.
- Type in SOFTWARE\Pervasive Software.

- Click OK.
- Click Finish to add the new resource. A message appears stating that the resource was created successfully.
- Click OK.
- In the Cluster Administrator, right-click on the Pervasive.SQL resource you just added. Click Properties.
- Click the Advanced tab.
- Ensure that the Restart option and the Affect the group option are selected.

Optionally, you may set the Threshold and Period values to your choice.
- Click OK (click Apply then OK is the Apply button is enabled).
If your application(s) require only the transactional engine, you do not need to add the relational service to your cluster group. You may skip to To change the startup setting for the relational service .
To add the Pervasive.SQL relational service to a cluster group
If your application(s) requires the relational engine of Pervasive.SQL, you must also add the relational service to your cluster group. If your application(s) require only the transactional engine, you do not need to add the relational service to your cluster group. You may skip to To change the startup setting for the relational service .
- Add the Pervasive.SQL transactional service as explained in To add the Pervasive.SQL transactional service to a cluster group . The transactional service is required for the relational service.
- In the Cluster Administrator, right-click on the desired cluster group name, then click New4Resource.
- On the New Resources dialog, type in a name for the resource. The name is used only for display purposes within Cluster Administrator. Optionally, type in a description for the resource.
- Click the list for Resource type then click Generic Service.
- Click the list for Group then click the desired group.
- Do not check the option Run this resource in a separate Resource Monitor.
The information should look something like the following example:
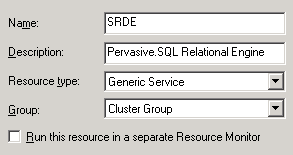
- Click Next. The Possible Owners dialog appears.
- Specify the nodes that can function as possible owners for the resource. (Add the nodes to the list of possible owners.)
- Click Next. The Dependencies dialog appears.
- In the Available resources list, click the Pervasive.SQL transactional resource that you added with the procedure To add the Pervasive.SQL transactional service to a cluster group . For example, if you named the transactional resource "Btrieve," click on "Btrieve."
- Click Add. This adds the resource to the list of dependences.
You do not need to add the resources IP Address, Network Name, and File Share because they are dependencies of the transactional resource.
- Click Next. The Generic Services Parameters dialog appears.
- For Service name, type in Pervasive.SQL (relational).
- Leave the Start parameters blank.
- Click the option Use Network Name for computer name.
The information must be the following:

Note
Ensure that you check the option Use Network name for computer name. This option allows the Pervasive.SQL relational engine to open files directly on the shared disk, which improves performance.
- Click Next. The Registry Replication dialog appears.
- Decide how you want to handle DSNs.
You may specify the key SOFTWARE\ODBC if you want. However, this affects all ODBC data sources and ODBC providers installed on the cluster node. Pervasive.SQL may not be the only ODBC provider installed on the cluster node. If it is the only ODBC provider, this is a fast way to ensure that all Pervasive.SQL data source names (DSNs) identified in your cluster can be used by all cluster nodes.
If you do not want to specify SOFTWARE\ODBC, then you must set up the individual DSNs on each cluster node.
Decide on one of the following as your preferred way to handle DSNs.
- To specify all ODBC providers, click Add. The Registry Key dialog appears. Type in SOFTWARE\ODBC. Click OK and continue with step 18. All nodes in your cluster now have this key in their registry.
- To specify separate DSNs, do not add any key for registry replication. Continue with the remaining steps in this procedure, then perform the steps in To specify DSNs on each cluster node .
- Click Finish to add the new resource. A message appears stating that the resource was created successfully.
- Click OK.
- In the Cluster Administrator, right-click on the Pervasive.SQL resource you just added. Click Properties.
- Click the Advanced tab.
- Ensure that the Restart option and the Affect the group option are selected.

Optionally, you may set the Threshold and Period values to your choice.
- Click OK (click Apply then OK is the Apply button is enabled).
To change the startup setting for the relational service
This task is required only if you did not add the relational service to your cluster group. (See Install Pervasive.SQL on the Cluster Nodes .) If you added the relational service to your cluster group, skip this task.
- Display the Services dialog. For example, on Windows NT, click Start4Settings4Control Panel, then double-click Services.
- In the list, click on the service Pervasive.SQL (relational).
- Click Startup.
- For Startup Type, click either the Manual option or the Disabled option.
- Click OK.
- If the service is running, click Stop.
- Click Close.
Configure the Engines with PCC
Your next task is to configure the engine by using Pervasive Control Center (PCC). The configuration settings are added to the registry. You need to configure the engine on one node in your cluster, then initiate a failure to migrate the settings to the next node in your cluster.
To configure the engines for clustering
- In the PCC name space, right-click on Pervasive.SQL Engines then click Register New Engine.
- For computer name, type in the Network Name of the cluster shared disk subsystem.
Ensure that you specify the Network Name of the cluster shared disk and not the machine name of a cluster node. The following example shows the registration of a new engine on the cluster shared disk named WIN2K-CLUSTER.
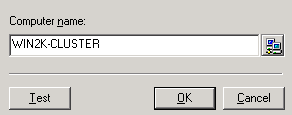
- Click OK. (Optionally, you can click Test to test the connection, then click OK.)
- In the PCC name space, click on Configuration. The server login dialog appears.
- Type in the user name and password of an administrator. Click Login.
- Expand the Configuration settings, then the Server settings (click the plus signs).
- Click on Directories.
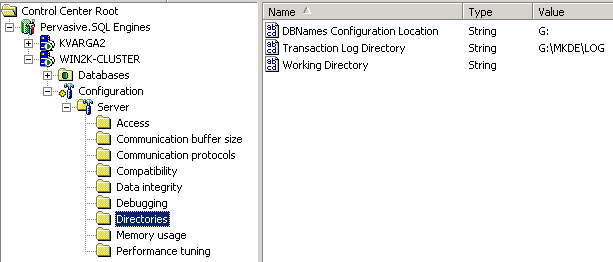
- Double-click DBNames Configuration Location. Type in a location on the cluster shared drive where you want the dbnames configuration file to reside.
For example, if the shared disk is drive G: and you want the dbnames configuration file to reside in a directory named "config," type in G:\config.
- Click OK.
- Double-click Transaction Log Directory. Type in a location on the cluster shared drive where you want the log to reside.
- Click OK.
- Click on Communication Protocols.

- Ensure that TCP/IP Multihomed is ON. If it is not, double-click TCP/IP Multihomed, click On, then click OK.
- Click the apply icon in the PCC to apply the configuration changes. The apply icon contains an exclamation mark (!).
You now need to restart the Pervasive.SQL services to apply the configuration changes. You restart the services with the Cluster Administrator.
- In the Cluster Administrator, right-click on the Pervasive.SQL transactional resource. This is the resource you added with the steps To add the Pervasive.SQL transactional service to a cluster group .
- Click Take Offline. This takes both the transactional service and the relational service offline. The relational has a dependency on the transactional.
- In the Cluster Administrator, again right-click on the Pervasive.SQL transactional resource. Click Bring Online.
- Right-click on the Pervasive.SQL relational resource (if you added the relational resource). Click Bring Online.
The configuration settings are now applied to the Pervasive services. However, the settings are in the registry only on the controlling cluster node. You need to initiate a failure to ensure that the settings are migrated to the registry on the surviving node(s).
- In the Cluster Administrator, right-click on the Network Name, then click Initiate Failure. Repeat this action until a failure occurs. The number of times you must repeat the action depends on the threshold setting.

The next surviving node becomes the new controlling node of the cluster.
Repeat this step until you have initiated failure to each cluster node. If you prefer, when finished, initiate failure back to the cluster node from which you started (the node for steps 1 through 18). This is not required unless you want that cluster node to be the controlling node.
Note
Ensure that failure occurs or the registry settings will not migrate to the surviving node(s).
To specify DSNs on each cluster node
This task is required only if you did not specify the registry key SOFTWARE\ODBC in step 17 of the task To add the Pervasive.SQL relational service to a cluster group . If you added the registry key SOFTWARE\ODBC, skip this task.
Note that DSNs are stored in the registry as key entries. Cluster Administrator works only with registry keys, not with the individual entries.
You need to create the DSNs on one cluster node, initiate failure, and create the same DSNs on the surviving node. You repeat this until all cluster nodes contain the DSNs.
Note
You must configure the engines by using the PCC before performing this task. See To configure the engines for clustering .
- On the controlling cluster node, open the ODBC Administrator.
- Click the System DSN tab.
- Click Add. The Create New Data Source dialog appears.
- In the list, click Pervasive ODBC Engine Interface.
- Click Finish. The Pervasive ODBC Engine DSN Setup dialog appears.
- Click Create (to specify a database name).
- For Database Name, type in the name of the Pervasive.SQL database.
- For Directory Location, type in (or browse to) the location on the cluster shared drive where the database files reside. This is the location of the DDF files.
- Click OK to return to the Pervasive ODBC Engine DSN Setup dialog.
- For Data Source Name, type in a name by which you want to refer to the database.
- Click OK.
- Repeat steps 1 through 11 for each Pervasive.SQL database involved in clustering.
- In the Cluster Administrator, right-click on the Network Name, then click Initiate Failure. Repeat this action until a failure occurs. The number of times you must repeat the action depends on the threshold setting.

The next surviving node becomes the new controlling node of the cluster. Initiating failure is required because the engine must be running for you to create the DSNs.
- Open the ODBC Administrator on the new controlling node.
- Click the System DSN tab.
- Click Add. The Create New Data Source dialog appears.
- In the list, click Pervasive ODBC Engine Interface.
- Click Finish. The Pervasive ODBC Engine DSN Setup dialog appears.
- In the list for Database Name, click the database name you want.
The list contains all of the names that you added with steps 1 through 12 because those steps updated dbnames.cfg on the shared disk.
- For Data Source Name, type in the appropriate name. That is, the names used in steps 7 and 10 must match the names in steps 19 and 20.
- Click OK.
- Repeat steps 13 through 21 for each node in the cluster on which you have not set up the DSNs.
Establish Pervasive.SQL Databases on the Cluster Shared Disk
You may establish a Pervasive.SQL database on a cluster shared disk by creating a new database or by copying an existing database.
To create a new database on a shared disk.
Use the Create Database wizard in the PCC to create a database directly on the cluster shared drive. See Adding or Creating a Database in Pervasive.SQL User's Guide.
Since the wizard also sets up the DSN, all cluster nodes are aware of the new DSN if you specified the registry key SOFTWARE\ODBC in step 17 of the task To add the Pervasive.SQL relational service to a cluster group . If you did not add that registry key, then you need to create the DSN on each cluster node. See To specify DSNs on each cluster node .
To copy an existing database to a shared disk
A previously existing database must be copied to the shared drive. You then use the PCC to change the location of the dictionary and data files.
- Copy the database directory or directories to the shared drive.
- In the PCC name space, right-click on Configuration for the database.
- Click Maintain Named Database.
- Click on the database in the list of Registered DB Names.
- Change the Dictionary Location to the location on the shared drive.
- Change the Data File Locations to the location(s) on the shared drive.
- Click OK.
To test the transactional connection from a Pervasive.SQL client
- Connect a drive to the shared disk subsystem from a computer running a Pervasive.SQL client.
From a command prompt on a client computer, execute the following command:
net use X: \\WIN2K-Cluster\Gdrive
This example connects drive "X" on a computer to the "G" drive on shared disk subsystem "WIN2K-Cluster." "WIN2K-Cluster" is the Network Name. "Gdrive" is the File Share.
- Copy the sample database DEMODATA (the DEMODATA folder) from the controlling cluster node to the cluster shared disk. (This step is not required if you already have a Pervasive.SQL database on the cluster shared disk. These steps assume that you do not.)
- At a command prompt on the client workstation, execute the following command (using drive X as an example):
butil -stat x:\demodata\file.ddf
If the command executes successfully, the Pervasive.SQL client is communicating with the database on the cluster shared disk. A successful execution returns information such as file version, page size, total number of records, and so forth.
- In the Cluster Administrator, right-click on the Network Name, then click Initiate Failure. Repeat this action until a failure occurs. The number of times you must repeat the action depends on the threshold setting.

This fails the node currently controlling the shared disk of the cluster. A surviving node in the cluster becomes active and assumes control of the shared disk.
- After the failure, execute the following command from the client workstation (using drive X as an example):
butil -stat x:\demodata\file.ddf
If the command executes successfully, the Pervasive.SQL client is communicating with the database on the cluster shared drive. A successful execution returns information such as file version, page size, total number of records, and so forth.
To test the relational connection from a Pervasive.SQL client
This test is required only if you added the relational service to your cluster group.
- Connect a drive to the shared disk subsystem from a computer running the Pervasive.SQL client.
Example: net use X: \\WIN2K-Cluster\Gdrive
This example connects drive "X" on a computer to the "G" drive on shared disk subsystem "WIN2K-Cluster." "WIN2K-Cluster" is the Network Name. "Gdrive" is the File Share.
- Create a directory on the cluster shared disk named DEMODATA2.
- From the controlling cluster node, copy all of the files from the directory of the sample database DEMODATA to the DEMODATA2 directory. By default, DEMODATA is located at C:\PVSW\DEMODATA.
- On the controlling cluster node, open the ODBC Administrator. For example, on Windows NT, click Start4Settings4Control Panel, the double-click ODBC Data Sources.
- Click the System DSN tab.
- Click Add. The Create New Data Source dialog appears.
- In the list, click Pervasive ODBC Engine Interface.
- Click Finish. The Pervasive ODBC Engine DSN Setup dialog appears.
- Click Create (to specify a database name).
- For Database Name, type in DEMODATA2.
- For Directory Location, type in (or browse to) DEMODATA2. Include the drive letter. For example, G:\DEMODATA2.
- Click OK to return to the Pervasive ODBC Engine DSN Setup dialog.
- For Data Source Name, type in DEMODATA2.
- Click OK.
- On the System DSN tab, click Pervasive ODBC Client Interface.
- Click Finish. The Pervasive ODBC Client DSN Setup dialog appears.
- Type in the address of the shared disk subsystem (this is the Network Name).
- Click Get DSN List.
- For the server DSN, click DEMODATA2 in the list.
- Type in a name for the client DSN. The information should look similar to the following example:
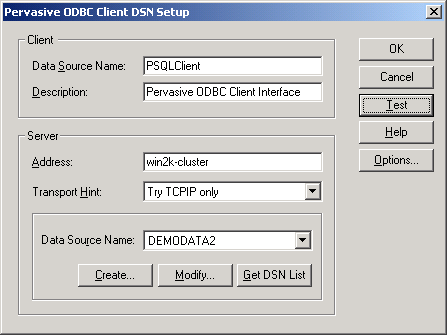
- Click Test. A successful test indicates that the client DSN is communicating with the engine. Click OK to dismiss the Test Connection message box.
- Click OK to close the Pervasive ODBC Client DSN Setup dialog.
- In the Cluster Administrator, right-click on the Network Name, then click Initiate Failure. Repeat this action until a failure occurs. The number of times you must repeat the action depends on the threshold setting.

This fails the node currently controlling the shared disk of the cluster. A surviving node in the cluster becomes active and assumes control of the shared disk.
- On the controlling cluster node, open the ODBC Administrator.
- Click the System DSN tab.
- Double-click the client DSN you created in step 20. The Pervasive ODBC Client DSN Setup dialog appears.
- Click Test. A successful test indicates that the client DSN is communicating with the engine. Click OK to dismiss the Test Connection message box.
- Click OK to close the Pervasive ODBC Client DSN Setup dialog.
| Prev Server Clustering |
Contents Up Check for Revisions | Next NetWare Cluster Services |