![]()
| Prev | Advanced Operations Guide | Next |
NetWare Cluster Services
NetWare Cluster Services is supported by the Pervasive.SQL Server engine on the following configurations:
This section assumes that you are familiar with the installation and configuration of Cluster Services and need only the information required to configure Pervasive.SQL for Cluster Services.
If you are not familiar with Cluster Services technology, please refer to the NetWare documentation for how to install Cluster Services, verify it is working correctly, and perform tasks with it.
How to Proceed
This section is organized in the manner in which you should proceed to add Pervasive.SQL to your cluster. That is, this section gives you the following suggested approach:
- Verify that Cluster Services is functioning correctly
- Modify the load script if required
- Configure the engines by using the Pervasive Control Center (PCC) and ensure identical configuration information
- Establish the Pervasive.SQL databases on the cluster shared disk
Verify Cluster Services is Functioning Correctly
Refer to the Novell documentation for how to install Cluster Services and verify it is working correctly. Also consult the NetWare documentation for how to use ConsoleOne and how to perform tasks with Cluster Services.
During installation of Cluster Services, you create a NetWare cluster object. The Novell documentation details the information required when you create a cluster object. This information is required for any cluster object, including an object for the Pervasive.SQL database engines.
At a minimum, ensure that you know the following when you create a cluster object:
- Server Names. These are the names of the servers (nodes) that are to be included in the cluster.
- IP Address. This is the IP address of the shared disk subsystem.
- Cluster Volume. This is the volume of the disk shared by the cluster nodes.
After you create a cluster object, you may verify that Cluster Services is functioning correctly.
To verify that Cluster Services is functioning correctly
- Connect a drive on a client computer to the shared disk subsystem. (This step assumes that you are using a computer on which a Pervasive.SQL requester is, or will be, running.)
From a command prompt on a client workstation, execute the following command:
net use X: \\nw_cluster_object_server\vol1
This example connects drive "X" on a workstation to volume 1 of the shared disk.
- Verify that you can execute a command on the connected drive. For example, switch to the drive of the shared disk and display a directory with the
dircommand:- Verify that you can connect to the IP address of the shared disk subsystem. From a command prompt, execute the following command: ping shared disk subsystem address. For example, ping 199.99.99.99.
If the command returns something like Reply from IP address, then you can connect to the IP address. For example, the following reply shows a successful connection:
Reply from 199.99.99.99: bytes=32 time<10ms TTL=128
Check that the IP address in the reply is the correct address of the shared disk subsystem.
The next three steps, 4, 5, and 6, require that you have administrator authority.
- In ConsoleOne, click on the cluster object in the left pane, then click View4Cluster State. Click the Cluster State tab. You should see something similar to the following.
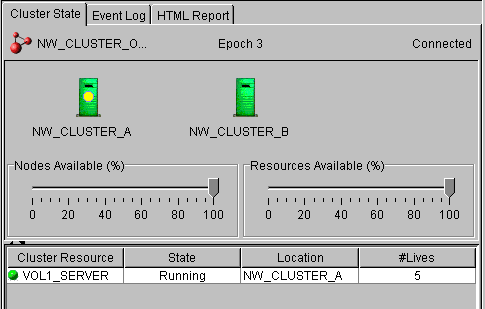
- In the right pane, click on a Location.

- Click on a migration target, then click Migrate. For example, the following image shows NW_Cluster_B as the migration target.
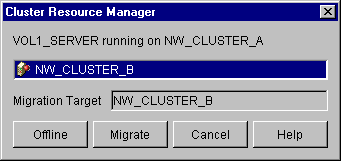
The migration target becomes active and assumes control of the shared disk. In the ConsoleOne interface, you will see the location change to the migration target and the number of lives (#Lives) increment by one.
- On the client workstation used for step 1, verify that you can still execute a command on the connected drive. For example, display a directory with the dir command.
The cluster is functioning correctly if you can execute a command on the shared disk subsystem from a client workstation before and after a migration. If you cannot, check the setup of Cluster Services.
Failback
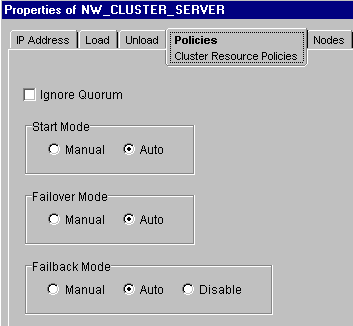
Optionally, you may want to enable failback for the cluster object. Failback is a feature of clustering that specifies a preferred node within the cluster.
For example, suppose your cluster contains two nodes, Server A, the preferred controlling node, and Server B. If Server A fails, Server B assumes control. When Server A comes back online, control passes back to it automatically. This automatic transfer of control is referred to as failback (clustering automatically "fails back" to the preferred node).
You specify failback on the properties dialog of the volume resource. (Click View4Console View to see the volume resources in the right pane of ConsoleOne.) On the Policies tab, set Failback Mode to Auto.
Note
When the cluster node fails back to the preferred server, a Pervasive.SQL client loses connection with the database engine. No automatic reconnection occurs. Your application must reconnect the client to the Pervasive.SQL database or you must restart the application. This applies even if Enable Auto Reconnect is turned on in the PCC.
Pervasive.SQL does not maintain the transaction state when the failback occurs. The transaction state does not transfer to the preferred server. Transactions are automatically rolled back to the state before the transaction began.
Modify Load Script if Required
The creation of a cluster object creates a default load and unload script. These scripts are necessary to dismount and mount the volume of the shared disk during a failover.
Depending on your applications, you may use the default load and unload scripts as is. If your applications do not access Pervasive.SQL data files with long file names, you may use the default scripts as is. You do not need to add anything specific for Pervasive.SQL.
However, if your applications access data files with long file names, you need to modify the load script only. You may use the default unload script as is.
The reason the load script must be modified is that volumes must be mounted before the Pervasive engines are started if an application accesses data files with long file names. To modify the load script, you must add the commands mgrstop, bstop, bstart, and mgrstart.
You specify the script on the properties dialog of the volume resource. (Click View4Console View to see the volume resources in the right pane of ConsoleOne.) Click the Load tab then specify the script.
Table 9-1 shows an example of a modified load script. You add mgrstop and bstop to the top of the script, and bstart and mgrstart to the bottom.
Configure Engines and Ensure Identical Configuration Information
Each cluster node must contain identical configurations for the Pervasive.SQL database engines. This includes the server configuration settings made with the Pervasive Control Center (PCC) and information about all databases created through the PCC (such as data source names).
The easiest way in which to ensure identical configurations is to establish the configuration on one node and then copy the information to the other nodes.
To do this, first register the shared disk subsystem as a new engine to the PCC. (The task To configure an engine shows you how.)
Next, set the following PCC configurations:
- Transaction durability and transaction logging to OFF. (These settings must be off because only one Pervasive.SQL engine may control the files associated with these settings. In a cluster, the engine is running on all nodes.)
- Supported protocols to TCP/IP.
- TCP/IP Multihomed to ON (it is on by default).
Note that these are required. Transaction durability and transaction logging must be set to OFF, the supported protocol must be set to TCP/IP, and TCP/IP Multihomed must be ON. See To configure an engine for the steps to set these configurations.
From the node that is hosting the shared disk, you then copy the following files to all other cluster nodes:
For example, suppose that node NW_CLUSTER_A is hosting the shared disk, which is named NW_CLUSTER_OBJECT_SERVER. Register NW_CLUSTER_OBJECT_SERVER to the PCC and set transaction durability and transaction logging to OFF and supported protocols to TCP/IP. Then copy bti.cfg, odbc.ini, and dbnames.cfg from the SYS volume of NW_CLUSTER_A to the other nodes.
You have a couple of alternatives to copying the bti.cfg, odbc.ini, and dbnames.cfg files to each node. You may register each cluster node in the PCC and set the configuration for each node. Or, you may register the shared disk subsystem, set the configuration, migrate to the next cluster node, set the configuration, and so forth until you have migrated to all cluster nodes.
How you achieve the end result does not matter as long as all nodes are configured identically.
This task shows how to configure an engine by using the PCC.
- In the PCC name space, right-click on Pervasive.SQL Engines then click Register New Engine.
- For computer name, type in the name of the shared disk subsystem.
The following example shows the registration of a new engine on NW_CLUSTER_OBJECT_SERVER.
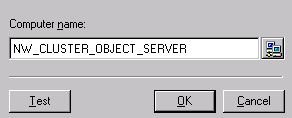
- Click OK. (Optionally, you can click Test to test the connection, then click OK.)
- In the PCC name space, click on Configuration for the engine you just registered. The server login dialog appears.
- Type in the user name and password of an administrator. Click Login.
- Expand the Server settings (click the plus sign).
- Click on Data Integrity.
- Ensure that Transaction Durability and Transaction Logging are both set to off. If either is on, double-click on the setting name, click Off, then OK.
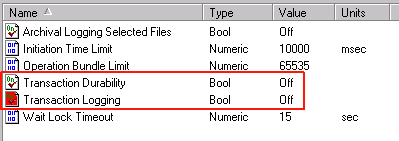
You may set Archival Logging Selected Files to on or off as you prefer, but Transaction Durability and Transaction Logging must be set to off. (These settings must be off because only one Pervasive.SQL engine may control the files associated with these settings. In a cluster, the engine is running on all nodes.)
Caution
By turning Transaction Durability and Transaction Logging off, you cannot guarantee data consistency and transaction atomicity across multiple files.
- Click on Communication Protocols.
- Double-click Supported protocols. Ensure that TCP/IP is the only protocol listed in the Selected pane. (Click the > button to add items to the Selected pane. Click the < button to remove items.)
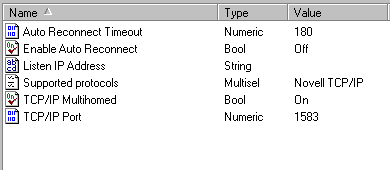
- Ensure that TCP/IP Multihomed is set to ON. If it is not, double-click the setting name, click On, then click OK.
- Click the apply icon in the PCC to apply the configuration changes. The apply icon contains an exclamation mark (!).
This task shows how to configure the engines by migration. Perform this task only if you want to configure the engines by the migration method. As an alternative method, you may prefer to configure the node hosting the shared disk, then copy bti.cfg, odbc.ini, and dbnames.cfg to the other nodes.
- Complete all of the steps in To configure an engine .
The next two steps require that you have administrator authority.
- In ConsoleOne, click on the cluster object in the left pane, then click View4Cluster State. In the right pane, click on Location.

- Click on a migration target, then click Migrate. For example, the following image shows NW_Cluster_B as the migration target.
The migration target becomes active and assumes control of the shared disk. In the ConsoleOne interface, you will see the location change to the migration target and the number of lives (#Lives) increment by one.
- For each node in the cluster, repeat the task To configure an engine and steps 1 through 3 of this task.
These actions could become tedious if you have numerous nodes in your cluster. For that reason, you may prefer to configure the node hosting the shared disk, then copy bti.cfg, odbc.ini, and dbnames.cfg to the other nodes.
Establish Databases on the Cluster Shared Disk
You may establish a Pervasive.SQL database on a cluster shared disk by copying an existing database or by creating a new database. For example, you may create a database with the PCC directly on the cluster shared disk. If you already have an existing Pervasive.SQL database, you may copy it to the cluster shared disk.
A Previously Existing Database
A previously existing database may be copied to the shared disk. You then use the PCC to change the location of the dictionary and data files.
- Copy the database directory or directories to the shared drive.
- In the PCC name space, right-click on Configuration for the database.
- Click Maintain Named Database.
- Click on the database in the list of Registered DB Names.
- Change the Dictionary Location to the location on the shared disk.
- Change the Data File Locations to the location(s) on the shared disk.
- Click OK.
Creating a Database With the PCC
Before using the PCC, you need to create a directory on the shared disk. This will be the location of the database files. After you create the directory, run the Create Database Wizard in the PCC to create a database. Specify the directory on the shared disk as the directory location for the database.
After you create a database, ensure that the DSNs are set for each cluster node. The easiest way to do this is to copy SYS:ODBC\odbc.ini and SYS:SYSTEM\dbnames.cfg from the hosting node to each of the other nodes.
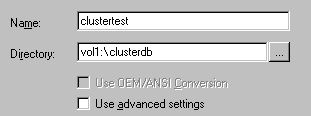
For example, suppose that node NW_CLUSTER_A is hosting the shared disk, which is named NW_CLUSTER_OBJECT_SERVER. You create a directory named CLUSTERDB on VOL1 of the shared disk.
With the Create Database Wizard, you create a new database named Clustertest. For directory, specify the volume and directory name, not a mapped drive letter. Continuing with our example, you would specify the following:
After the database is created, copy odbc.ini and dbnames.cfg from the SYS volume of NW_CLUSTER_A to the other nodes.
As an alternatives to copying the odbc.ini and dbnames.cfg files to each node, you could manually create the DSNs on the remaining nodes. How you achieve the end result does not matter as long as all nodes contain identical information about the database.
- Connect a drive on a client workstation with a Pervasive.SQL client to the shared disk subsystem.
From a command prompt on a client workstation, execute the following command:
net use X: \\nw_cluster_object_server\vol1
This example connects drive "X" to volume one on the shared disk.
- Copy the sample database DEMODATA (the DEMODATA folder) from the controlling cluster node to the cluster shared disk. (This step is not required if you already have a Pervasive.SQL database on the cluster shared disk. These steps assume that you do not.)
- At a command prompt on the client workstation, execute the following command (using drive X as an example):
butil -stat x:\demodata\file.ddf
If the command executes successfully, the Pervasive.SQL client is communicating with the database on the cluster shared disk. A successful execution returns information such as file version, page size, total number of records, and so forth.
The next two steps, 4 and 5, require that you have administrator authority.
- In ConsoleOne, click on the cluster object in the left pane, then click View --> Cluster State. In the right pane, click on Location.
- Click on a migration target, then click Migrate. For example, the following image shows NW_Cluster_B as the migration target.
The migration target becomes active and assumes control of the shared disk. In the ConsoleOne interface, you will see the location change to the migration target and the number of lives (#Lives) increment by one.
- After the migration, execute the following command from the client workstation (using drive X as an example):
butil -stat x:\demodata\file.ddf\file.ddf
If the command executes successfully, the Pervasive.SQL client is communicating with the database on the cluster shared disk. A successful execution returns information such as file version, page size, total number of records, and so forth.
- Connect a drive on a client workstation with a Pervasive.SQL client to the shared disk subsystem.
From a command prompt on a client workstation, execute the following command:
net use X: \\nw_cluster_object_server\vol1
This example connects drive "X" to volume one on the shared disk.
- Create a directory on the cluster shared disk named DEMODATA2.
- From the controlling cluster node, copy all of the files from the directory of the sample database DEMODATA to the DEMODATA2 directory. By default, DEMODATA is located at SYS:\PVSW\DEMODATA.
- In the PCC name space, right-click on the Databases node for the server name of the cluster shared disk. Click Create Database to start the Create Database wizard.
- Complete the Create Database wizard. For database name, type in DEMODATA2. For directory, type in VOL1:\DEMODATA2. (Capitalization does not matter.)

The wizard creates the engine DSN for the database. You next use the ODBC Administrator to create the client DSN.
- Open the ODBC Administrator. For example, on Windows NT, click Start4Settings4Control Panel, then double-click ODBC Data Sources. You may also open the ODBC Administrator from within the PCC by clicking Tools4ODBC Administrator.
- Click the System DSN tab.
- Click Add. The Create New Data Source dialog appears.
- In the list, click Pervasive ODBC Engine Interface.
- Click Finish. The Pervasive ODBC Engine DSN Setup dialog appears.
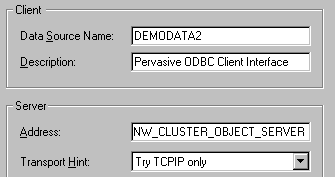
- For Data Source Name, type in DEMODATA2. For Address, type in the server name of the shared disk. The following example shows that the server name of the shared disk is NW_CLUSTER_OBJECT_SERVER.
- Click the Get DSN List button.
- Select DEMODATA2 in the list.

- Click Test. A successful test indicates that the client DSN is communicating with the engine. Click OK to dismiss the Test Connection message box.
- Click OK to close the Pervasive ODBC Client DSN Setup dialog.
- Click OK to close the ODBC Data Source Administrator dialog.
- From the server that is hosting the shared disk, copy SYS:\ODBC\odbc.ini and SYS:\SYSTEM\dbnames.cfg to the other cluster nodes. (Alternatively, you could migrate to each cluster node and create the DEMODATA2 DSN on that node.)
The next two steps, 18 and 19, require that you have administrator authority.
- In ConsoleOne, click on the cluster object in the left pane, then click View --> Cluster State. In the right pane, click on Location.
- Click on a migration target, then click Migrate. For example, the following image shows NW_Cluster_B as the migration target.
The migration target becomes active and assumes control of the shared disk. In the ConsoleOne interface, you will see the location change to the migration target and the number of lives (#Lives) increment by one.
- Open the ODBC Administrator.
- Click the System DSN tab.
- Double-click the DEMODATA2 DSN. The Pervasive ODBC Client DSN Setup dialog appears.
- Click Test. A successful test indicates that the client DSN is communicating with the engine. Click OK to dismiss the Test Connection message box.
- Click OK to close the Pervasive ODBC Client DSN Setup dialog.
| Prev Microsoft Cluster Service |
Contents Up Check for Revisions | Next SFT III for NetWare 4.2 |