
| Prev | User's Guide | Next |
Setting Database Security
For further information on database security, see Advanced Operations Guide, Pervasive.SQL Security.
Database security helps prevent intruders from accessing the data on your databases or unintentional damage to data by authorized users. By default, security is turned off. Security is enabled on Pervasive.SQL databases through the PCC or by executing an SQL statement.
Note
When turning security on or off, all database connections must be closed. Because SQL Data Manager uses additional connections, you must close all SQL Data Manager windows before attempting to turn security on or off. If you are viewing the contents or properties of any table in the database, then you must close that window before proceeding.
Turning Security On and Off
To set database security from within the PCC
- Right-click on a database icon in PCC Namespace. Select the Properties menu item.
- Select the Security tab in the Database properties dialog box.
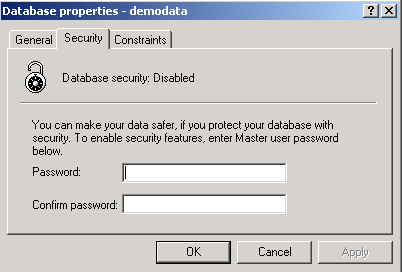
Figure 3-15 Database Properties Dialog Box
Caution
Be sure to specify a password with significant length, at least five characters. Do not leave the password field blank because doing so creates a major security risk for your database.
The database is now secured, and a single user named "Master" has been created with the password you specified. Until additional users are created and assigned permissions in the database, only the Master user is permitted to view or update data.
A secure database supports individual users and groups of users who have the same set of permissions. Additional users and groups may be added to the database through the Users namespace node under the database. For more information about adding users and groups, see Working with Groups and Users .
Caution
Turning off database security deletes all users, groups, and permissions. If you turn security back on, you must re-create all users and groups.
- Right-click on the icon for your database in the PCC Namespace and choose Properties in the shortcut menu.
- Select the Security tab in the Database properties dialog box.
- Since security is on, the pane includes a check box entry to turn security off. Select it and press OK to turn off security. Unless you have an open database session, Pervasive.SQL prompts you for the Master password before turning off security.
Working with Groups and Users
For any data files in your database with Btrieve owner names set, you cannot use PCC to grant access to these files. You must use the GRANT statement with the appropriate owner name. Refer to the SQL Engine Reference for a discussion of the GRANT statement.
To add a new group to the database
- Select the Namespace node Users under the database in which you would like to add a new group.
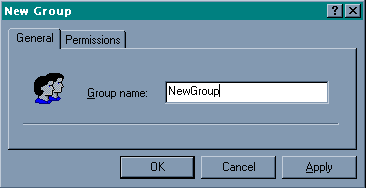
- Right-click Users. Select New Group from the shortcut menu. The following dialog box appears:
Figure 3-16 Add New Group Dialog Box
- Type in a group name.
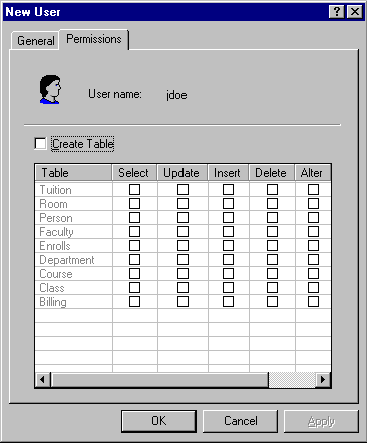
- Click on the Permissions tab to select the specific operations that this Group is entitled to perform on the database:
Figure 3-17 Add New User / Group Permissions Dialog Box
Each check box represents a specific permission for a specific table. For example, if you want members of this group to be able to perform SELECT operations on the "Billing" table, click the box on the row labeled "Billing" under the column "Select."
- Click OK when done.
You can also perform the task of creating a group and assigning permissions using the SQL statements CREATE GROUP and GRANT.
To add a new user to the database
Note
If you wish to use groups, you must set up the groups before creating users. You cannot add a user to a group after you have already created the user.
- Select the Namespace node Users under the database in which you would like to add a new user.
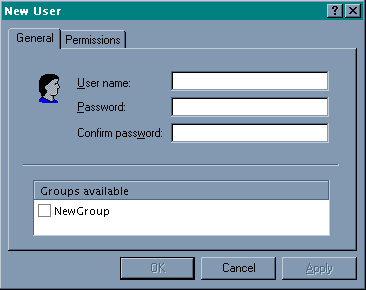
- Right-click Users. Select New User from the shortcut menu. The following dialog box appears:
Figure 3-18 Add New User Dialog Box
Enter the new user information in the name and password fields and select the group, if any, to which the new user belongs.
Note
Group members do not have individual permissions. Every member of a group has exactly the permissions that have been defined for the group.
- Click on the Permissions tab to select the specific operations that this user is entitled to perform on the database:
Figure 3-19 Add New User / Group Permissions Dialog Box
Each check box represents a specific permission for a specific table. For example, if you want members of this group to be able to perform SELECT operations on the "Billing" table, click the box on the row labeled "Billing" under the column "Select."
- Click OK when done.
You can also perform the task of creating a user and assigning permissions using the SQL statement GRANT.
Note
To delete a group, you must first delete all users in the group. You cannot delete a group that contains users.
- Double-click the Users node in PCC. Right-click on the icon representing the user or group you want to delete.
- From the pop-up menu, click Delete.
You can also perform this task using the SQL statement REVOKE LOGIN FROM user.
To add an existing user to a group
Existing users cannot be directly added to a group. Follow these steps:
- Delete the user by following the steps provided in To delete a user or group .
- Re-create the user by following the steps provided in To add a new user to the database .
| Prev Dropping a Table |
Contents Up Check for Revisions | Next Stopping and Restarting Services on Windows Servers |