

| Prev | User's Guide | Next |
SQL Data Manager Tasks
This section explains the tasks that you perform with SQL DM. The tasks are divided into the following categories:
What to do first? If you are new to SQL DM, begin with the general tasks. If you are new to SQL programming, begin with the tasks for Query Builder. If you are experienced with SQL programming, begin with the tasks for Query Pane.
General Tasks
General tasks orient you to the overall use of SQL DM.
- To start SQL DM as a stand-alone application
- To start SQL DM from PCC
- To identify machine and database currently open
- To open a database
- To create an SQL query or script
- To close a database
- To change data with Grid Results grid
- To save an SQL query as a script
- To open an SQL script
- To display help
- To exit SQL DM
Query Pane Tasks
Query Pane tasks help you use Query Pane.
- To show or hide Query Pane
- To move the cursor within Query Pane without running any SQL statements
- To move the cursor within Query Pane and run the SQL statement to which it moves
- To set SQL statement separator
- To wrap text within Query Pane
- To cancel (undo) typing actions in Query Pane
- To find text in Query Pane
- To replace text in Query Pane
- To select text in Query Pane
- To copy text from Query Pane
- To paste within Query Pane
- To cut or delete text from Query Pane
- To print the contents of Query Pane
- To layout the printed page
- To toggle insert/overtype mode
- To set the font for Query Pane
Execution and Results Tasks
Execution and results tasks apply to the running of SQL statements and working with results on the Grid Results tab and the Text Results tab.
- To run a single SQL statement
- To run all SQL statements
- To stop running SQL statements
- To work with grid results
- To set Grid Results to allow changes to database data
- To set default behavior for Grid Results tab
- To delete a row(s) from Grid Results tab
- To work with text results
- To clear results from Text Results tab
- To select text on Text Results tab
- To copy text from Text Results tab
- To cut or delete text from Text Results tab
Query Builder Tasks
Query Builder Diagram tasks orient you to the use of Query Builder Diagram and Query Builder Grid.
- To show or hide Query Builder Diagram
- To show or hide Query Builder Grid
- To set query type for Query Builder
- To build a SELECT statement with Query Builder
- To build an UPDATE statement with Query Builder
- To build an INSERT statement with Query Builder
- To build a DELETE statement with Query Builder
- To add a table to Query Builder Diagram
- To remove a table from Query Builder Diagram
- To insert a row into Query Builder Grid
- To delete a row(s) from Query Builder Grid
- To delete a row(s) from Query Builder Grid
- To add a Group By column to Query Builder Grid
General Tasks
To start SQL DM as a stand-alone application
- From the desktop, click Start4Programs4 Pervasive.SQL V84 SQL Data Manager.
This step assumes that SQL DM was installed as part of a Pervasive.SQL default installation. A vendor application that uses an embedded database engine may require that you start SQL DM with different menu commands. (The GUI executable is named sqldmgr.exe.)
SQL DM starts by providing a dialog in which you choose a database engine and database name to connect to. By default, the local database engine (on the same computer as SQL DM) is specified.
- Click the desired database engine and database to open.
- Click OK.
Note
SQL DM opens a separate instance for each database. This means that you can open multiple instances of SQL DM for the same database. Changes saved in one instance are reflected in another instance only if you run a query (or queries) in the other instance. For example, suppose you start SQL DM twice (called instance A and B) for database MyDBase. If you change data in instance A and save the changes, you need to run a SELECT statement in instance B to see those changes.
- Start PCC if it is not already running. (Click Start4Programs4Pervasive.SQL V84Control Center.)
- Expand the tree in the namespace (click the plus signs) until the Tables node appears for the database in which you are interested.
- In the PCC data pane, right-click on a table icon, then click Open. You may also double click the table icon.

SQL DM starts and runs a Select * From table_name statement, where table_name is the name of the table icon. The results are placed into the Grid Results tab.
Note
SQL DM opens a separate instance for each table. This means that you can open multiple instances of SQL DM from PCC for the same table. Changes saved in one instance are reflected in another instance only if you run a query (or queries) in the other instance. For example, suppose you open SQL DM twice (called instance A and B) for table MyTable. If you change data in the grid in instance A and save the changes, you need to run a SELECT statement in instance B to see those changes.
To identify machine and database currently open
- Observe the SQL DM title bar.
The title bar shows the name of the open database and the name of the machine on which the database resides.
For example, the following image shows that DEMODATA is the open database and DOCLAB2 is the machine on which DEMODATA resides.

If the title bar does not show the name of a database and the name of a machine, then no database is open.
- Click File4Open Database.
The Login to database dialog appears.
If the desired database has Pervasive.SQL security enabled, type the user name and password required for the database in the User and Password fields, respectively. By default, the user name is Master. If the database does not have security enabled, you may leave the User and Password fields blank.
- Click a desired server in the Server list.
- Click a desired database in the Database list.
- Click OK.
To create an SQL query or script
By default, when you start SQL DM, Query Pane is ready for you type in SQL statements. Statements that you build with Query Builder also appear in Query Pane. Note that Query Builder clears the contents of Query Pane, so you will lose any statements typed in unless you have saved them as a script. A script is one or more SQL statements saved as an ASCII file. See To save an SQL query as a script .
- Perform one of the following actions:
- Type the SQL query into Query Pane.
Separate SQL statements with a delimiter. By default, SQL DM uses the pound sign (#). You may change this delimiter character to the semi-colon (;). See To set SQL statement separator .
Note that you must use the pound sign as the statement delimiter in Query Pane if you create stored procedures. Stored procedures use the semicolon as a statement delimiter within the procedure itself.
- Click File4New SQL Query or click
.
If Query Pane contains statements that have not been saved, you are prompted to save them. Click Yes to save the existing statements, specify a file name and location, then click Save. Click No to discard the existing statements.
Any SQL statements in Query Pane are cleared and the statement indicator is positioned at the top left of the pane. The indicator is the yellow arrow
.
- Use Query Builder to build a statement. See Query Builder Tasks .
If execution stops because of an error, the statement indicator positions to the statement that was being run when the interruption occurred. Also, the Text Results tab lists the statement that was last run. Knowing the last statement run can help you troubleshoot the problem. See To continue running SQL statements that were stopped .
- Click File4Close Database.
- Click Yes to confirm that you want to close the database.
Note that the title bar no longer shows the name of an open database or the name of a machine on which the database resides. In addition, the commands and icons for running a query become inactive (grayed out). You can run a query only if a database is open.
To change data with Grid Results grid
The Grid Results grid must be active before you can change values in cells. See To set Grid Results to allow changes to database data .
Note
If you have a table without primary keys that contains records with duplicate data for a column, you will be unable to update the duplicate data on the Grid Results tab. SQL DM cannot tell one record from another because of the duplicate data. This problem does not occur if your table contains primary keys because they prevent duplicate data. (You may use an UPDATE statement to change duplicate data.)
- Click the Grid Results tab.
- Populate the grid by running a SELECT statement in Query Pane. Click Tools4Query4Run Current SQL statement in grid or click
.
After the grid has been populated by a SELECT statement, you may directly update the table by making changes to the values in the active grid. You must have the proper table permissions to affect the database data.
- Change the data in one or more grid cells for a particular row.
An icon that indicates a changed value appears in the leftmost column of the row:

- Perform an action in SQL DM that causes the changed data to be written to the database. The following actions result in the data being changed:
- Clicking the leftmost column of the row containing the changed data (clicking the
icon for the row)
- Moving to a grid row or a cell different from the one containing the changed data (you may move with the Tab key, arrow keys, or by using the mouse)
- Running a SELECT statement
- Closing the database (File4Close Database)
- Exiting SQL DM (File4Exit).
Note You may see the row in which you change a value move to a different location within the grid. An example helps clarify why this occurs.
Suppose you have a table, t1, with a single integer column, col1, that contains the values 1 through 5 in ascending order. If you run a SELECT * statement against t1, SQL DM returns 5 records. Now assume you delete record 3 (DELETE FROM t1 WHERE col1=3). Your table now has a "hole" in it where record 3 existed. If you run a SELECT * statement again, SQL DM returns 4 records (1, 2, 4, and 5).
Now assume you add another value for col1 at the bottom of the Grid Results tab (you type in "6" at the bottom of the integer column and press the Tab key). The record containing the value "6" moves in the grid to the 3rd position from the top. In other words, the new record occupies the "hole" that resulted from the deletion of the other record.
This is the normal behavior of the Grid Results tab. The SRDE fills any "holes" in a table that have resulted from deleting records. SQL DM just queries the database and displays the natural ordering of the records. Once all of the "holes" are filled, records are added to the end of the existing records.
To save an SQL query as a script
- Perform one of the following actions:
- Click File4Save SQL Query or click
.
If you do not have an SQL script already open, a Save As dialog appears. SQL DM assigns a default name to the query. The default name is queryn.sql, where n is an integer that increments by one. Query1.sql is the first default name, query2.sql the second, and so forth.
If you have an SQL script already open, a Save As dialog does not appear. SQL DM saves the SQL statements in Query Pane with the name of the open script, even if all lines from the open script have been cleared and new lines typed. For example, suppose you open MySQLScript.sql then click File4New SQL Query. Query Pane is cleared and the statement indicator is positioned to the top of the pane. You type an SQL statement then click File4Save SQL Query. The SQL statement is saved as file MySQLScript.sql.
- Click File4Save SQL Query As.
A Save As dialog appears. If you have an SQL script open, this option lets you save the query with a different file name.
- Click File4Open SQL Query or click
.
If Query Pane contains statements that have not been saved, you are prompted to save them. Click Yes to save the existing statements, specify a file name and location, then click Save. Click No to discard the existing statements.
- Type in the file name of the query you want to open in the File name field, or navigate to the location of the file and click on the file.
An SQL query file is an ASCII file of one or more SQL statements. By default, an SQL query files saved from SQL DM has a file extension of "sql."
- Click Open.
SQL DM places the contents of the open script into Query Pane. Note that if you change the script then click File4Save SQL Query or click
, the changes overwrite the script file. If you want to save the changes to a different location or as a different script name, click File4Save SQL Query As.
- Click Help, then the type of help you want:
- How Do I? - Lists the tasks that you can perform with SQL DM..
- Topics - Lists the documentation topics pertaining to SQL DM.
- SQL Reference - Displays an alphabetical list of SQL statements and keywords that are links to the SQL Engine Reference. (Statements not supported by SQL DM are listed below the alphabetical list.)
- Search Documentation - Searches for a string throughout the installed set of Pervasive.SQL documentation.
- What's This? - Identifies objects in the SQL DM GUI.
- Glossary - Defines terms used in the Pervasive.SQL documentation and products.
- Online Manuals (Web) - Directs your browser to www.pervasive.com where you can reference the online manuals.
- Knowledge Base (Web) - Directs your browser to www.pervasive.com where you can query the Pervasive.SQL Knowledge Base for additional information about Pervasive.SQL.
- Developer Center (Web) - Directs your browser to www.pervasive.com where you can research information specifically for application developers using Pervasive.SQL.
- About - Displays the name and version of SQL DM and the Pervasive.SQL copyright information.
- Click File4Exit. (You may also click the "X" close button in the upper right corner of the GUI.)
If Query Pane contains statements that have not been saved, you are prompted to save them. Click Yes to save the existing statements, specify a file name and location, then click Save. Click No to discard the existing statements.
Query Pane Tasks
To move the cursor within Query Pane without running any SQL statements
The statement indicator, the yellow arrow
in the left margin of Query Pane, indicates the statement in which the cursor is located.A statement delimiter is used to separate statements. See To set SQL statement separator .
To move the cursor within Query Pane and run the SQL statement to which it moves
The statement indicator, the yellow arrow
in the left margin of Query Pane, indicates the statement in which the cursor is located.A statement delimiter is used to separate statements. See To set SQL statement separator .
Note SQL DM shows the appropriate results tab as you move through the statements. Only SELECT statements send results to the Grid Results tab (you may also send SELECT results to the Text Results tab). All other statements send results to the Text Results tab.
For example, suppose you have the following lines in Query Pane:
SELECT * FROM Person#
SELECT * FROM Faculty#
DELETE FROM Person WHERE Person.ID=104321686#
SELECT * FROM Class#
Assume that the cursor is located on the first line and you click
to move to the next line, which contains a SELECT statement. The results show on the Grid Results tab. You click
again to move to the next line, which contains a DELETE statement. The results show on the Text Results tab. You click
again to move to the next line, which contains another SELECT statement. The results show on the Grid Results tab.
See also Results Tabs and To type comments into Query Pane .
To set SQL statement separator
Two or more SQL statements in Query Pane must be separated by a delimiter. By default, SQL DM sets the delimiter to the pound sign (#). You may change the delimiter to the semicolon (;) if you choose.
Note
You must use the pound sign as the statement delimiter in Query Pane if you create stored procedures. Stored procedures use the semicolon as a statement delimiter within the procedure itself.
To set a query time-out period
The query time-out period specifies how many seconds to allow an SQL statement to run before the SRDE cancels the statement. The default is zero seconds, which means that no time-out period is specified. The value you specify is stored in the registry and will also apply the next time you start SQL DM.
The time-out period applies to SELECT, UPDATE, INSERT, and DELETE statements, but not to Data Definition Language (DDL) statements (such as CREATE INDEX, ALTER TABLE, DROP TABLE, and so forth). The SRDE stops processing a query after the specified period, returns SQL_ERROR, and sets SQLSTATE to "S1T00." Because SQL statements are atomic, no records are updated, inserted, or deleted if the SRDE cancels an UPDATE, INSERT, or DELETE statement, respectively.
- Click Tools4Properties.
- Type a value for Query time-out.
The allowed range is 0 through 4,294,967,295. Partial seconds (for example, 30.5) and negative numbers are not allowed.
- Click OK.
To wrap text within Query Pane
By default, word wrap is turned off, which is indicated by lack of a checkmark beside the command.
To type comments into Query Pane
Single-line comments are indicated by double dashes (--) or double slashes (//). Each comment must be on a separate new line or after the statement separator on an existing line. See To set SQL statement separator .
SQL DM also supports the use of a start/end comment block that can span multiple lines (/* */).
- Click at the beginning of the line where you want a comment.
- Type "--" or "//" followed by your comment text.
The following example shows valid comments.
SELECT * FROM t2# -- This is valid after the # signThe following example shows multi-line comments.
SELECT * FROM t1# -- single line comment
/* This is a comment block that spans two lines.
Note If the cursor is positioned after the statement separator, the next statement is current. This is true even if the statement indicator, the yellow arrow
, is still on the line containing the cursor.
An example helps clarify this. Suppose you have the following lines in Query Pane:
SELECT * FROM Person# -- This is a comment
SELECT * FROM Faculty#
SELECT * FROM Class#
You run the first statement, then position the cursor in front of the "t" in "This." The cursor is positioned after the statement separator (#) on that line. The statement indicator still points to the line SELECT * FROM Person, but the actual current line is SELECT * FROM Faculty. If you click
to move to (and run) the next line, the statement indicator moves to (and runs) SELECT * FROM Class.
To cancel (undo) typing actions in Query Pane
- Perform one of the following actions:
- Click Edit4Undo (or press Control+Z) for each typing action that you wish to cancel.
For example, if you have typed "Select * From Person" and you click Edit4Undo, the word "Person" is removed. If you click Edit4Undo again, the word "From" is removed, and so forth.
- Right-click within Query Pane, then click Undo (or press Control+Z).
To cancel an Undo action (redo) in Query Pane
The Redo action performs the opposite of the last Undo action. For example, if the last Undo action removed the word "Select" from a statement, Redo restores the word "Select" to the statement.
- Right-click within Query Pane, then click Redo (or press Control+Y) for each Undo action that you want to cancel.
- Click Edit4Find (or press Control+F).
A dialog appears on which you specify a text string to find.
- Type, or paste, a text string into the Find what field.
- Specify any options for the search, such as case sensitivity and direction.
- Click Find Next.
- To repeat the search for the same string, click Edit4Find Next (or press F3).
- Click Edit4Replace (or press Control+H).
A dialog appears in which you specify a text string to search for and a text string with which to replace it.
- Type, or paste, a text string into the Find what field.
- Type, or paste, a text string into the Replace with field.
- Specify any options for the search, such as case sensitivity and direction.
- Perform one of the following actions:
- Click Cancel to exit the dialog.
- Perform one of the following actions:
- Click Edit4Select All, right-click within Query Pane then click Select All, or press Control+A. Any of these actions selects all of the contents of Query Pane.
- Press and hold down the left mouse button and drag the cursor across the text you want to select.
- Press and hold down the Shift key, then press a cursor arrow key to move the cursor across the text you want to select.
To cut or delete text from Query Pane
Text cut from Query Pane is placed in the clipboard and is available for pasting. Text deleted from Query Pane is not placed in the clipboard.
To print the contents of Query Pane
- Click File4Print.
A dialog appears on which you specify the options for printing.
- Specify any options for printing, such as printer name, printer range, and so forth.
- Click OK.
- Click File4Page Setup.
A dialog appears on which you specify the layout for the printed page.
- Specify any options for the printed page, such as paper size, margins, and so forth.
- Click OK.
To toggle insert/overtype mode
- Press the Insert key to toggle the text entry mode between insert and overtype.
Insert mode adds characters between other characters as you type in Query Pane. Existing characters are pushed to the right. Overtype mode replaces characters as you type.
When the Insert/Overtype indicator shows OVR in a dimmed typeface, SQL DM is in insert mode. When OVR is boldface, SQL DM is in overtype mode.


To set the font for Query Pane
Setting the font affects the font used in the Query Pane, the Grid Results tab, and the Text Results tab.
Execution and Results Tasks
A database must be open and one or more SQL statements must exist in Query Pane before you can run a statement.
- Move to the SQL statement you want to run. See To move the cursor within Query Pane without running any SQL statements .
- Perform one of the following actions:
Note
SQL DM automatically uses the Text Results tab for the results of SQL statements that are not SELECT statements. Only SELECT statements use the Grid Results tab.
A database must be open and one or more SQL statements must exist in Query Pane before you can run all statements. Two or more SQL statements in Query Pane must be delimited. See To set SQL statement separator .
To stop running SQL statements
- Click Tools4Query4Stop or click
.
The statement indicator positions to the statement that was being run when the interruption occurred. The indicator is the yellow arrow
.
If you stop the running of SQL statements, or if execution stops because of an error, the Text Results tab lists the statement that was last run. Knowing the last statement run can help you troubleshoot problems.
To continue running SQL statements that were stopped
- Click Tools4Query4Continue.
Execution of the SQL statements continues with the statement that contains the statement indicator. Note that you may move to a statement after execution stops. For example, suppose execution stops at statement 50 in a script that contains 100 statements. You could click on statement 60 and continue execution from there.
Unless you move the statement indicator, execution continues with the next statement following the one that last ran.
To set the font for grid results or text results
Setting the font affects the font used in the Query Pane, the Grid Results tab, and the Text Results tab.
- Perform one of the following actions:
- Specify the desired font characteristics, such as style and size.
- Click OK.
- Click the Grid Results tab.
After the grid has been populated by a SELECT statement, you may directly update your database data by changing the values in an active grid. You must have the proper table permissions to affect the database data. The grid must be active before you can change values in cells. See To set Grid Results to allow changes to database data .
To set Grid Results to allow changes to database data
Note A grid that allows changes to database data is referred to as "active." This means that if you change data in one of the grid cells, you change the data in your database provided you have the proper table permissions. By default, SQL DM starts with the Grid Results grid active.
See also To set default behavior for Grid Results tab .
- Click Tools4Active Grid.
A checkmark beside the Active Grid command indicates that the grid is active. In addition, an indicator column appears as the leftmost column in the grid:

To set default behavior for Grid Results tab
Note A grid that allows changes to database data is referred to as "active." This means that if you change data in one of the grid cells, you change the data in your database provided you have the proper table permissions. By default, SQL DM starts with the Grid Results grid active.
See also To set default behavior for Grid Results tab .
- Click Tools4Properties.
- Click the option Active grid mode on startup to set or clear the default behavior.
A checkmark beside the option indicates that the grid will be active each time SQL DM is started.
- Click OK.
To delete a row(s) from Grid Results tab
Note that the delete action has no undo. The grid must be active to allow deletion of rows. See To set Grid Results to allow changes to database data .
- Right-click on the row (the record) that you want to delete, then click Delete Row(s).
You may also select and delete multiple rows. To select multiple rows, press and hold down the Shift or Control key, then click the indicator column for the desired rows. Once the desired rows are selected, right-click and click Delete Row(s).
The indicator column is the leftmost column in the grid:

Once a row(s) is selected, you may also press the Delete key to delete the row(s).
Note that you cannot delete a row that contains invalid values in one or more grid columns. For example, assume that you want to delete a record from the "Person" table provided with the sample database DEMODATA.
You run a SELECT * FROM person statement in Query Pane. You click on an ID cell in the grid and remove the ID value with the Backspace key. You then decide that you want to delete the entire record. The Delete Row(s) command does not work because the ID column contains an invalid value (it is blank). The ID column in the "Person" table does not allow NULLs. You would first need to add a valid value into the ID cell, then delete the entire record.
To copy data from Grid Results tab to clipboard
Copied data is placed in the clipboard in a tab delimited format.
- Perform one of the following actions to select the desired data:
- Click the indicator column for the row(s) that you want to copy. The indicator column is the leftmost column in the grid:

To select multiple rows, press and hold down the left mouse button. Move the mouse pointer across the column indicator(s) for the row(s) you wish to select. You may also press and hold down the Shift or Control key, then click the indicator column for the desired row(s).
- Right-click on a cell (to set a starting place), then press and hold down the left mouse button. Move the mouse pointer across the cell(s) you wish to select.
- Left-click within a cell, then press and hold down the Shift key. Use the cursor arrow keys to extend the selection.
- Right-click on a single cell to select the contents of only that cell. Ensure that no other rows or cells are selected.
- Right-click, then click Copy.
The copied data can be pasted into another application, such as Microsoft Excel. For example, in Excel, you would click on a cell, right-click, then click Paste.
- Click the Text Results tab.
The Text Results tab shows in a text format the result of running SQL statements. You cannot change the data values in the database by changing the text.
To clear results from Text Results tab
To select text on Text Results tab
- Perform one of the following actions:
- Right-click within the Text Results tab then click Select All, or press Control+A. Either action selects all of the contents on the tab.
- Press and hold down the left mouse button and drag the cursor across the text you want to select.
- Press and hold down the Shift key, then press the cursor arrow keys to move the cursor across the text you want to select.
To copy text from Text Results tab
To cut or delete text from Text Results tab
Text must first be selected before you can cut or delete it. Text cut is placed in the clipboard and is available for pasting. Text deleted is not placed in the clipboard.
Query Builder Tasks
To show or hide Query Builder Diagram
A database must be open before you can show or hide Query Builder Diagram.
- Click View4Query Builder Diagram or click
.
These actions function as a toggle. That is, if Query Builder Diagram is hidden, the action shows it, and vice versa. See also Behavior When Query Builder Diagram Contains No Tables .
To show or hide Query Builder Grid
A database must be open before you can show or hide Query Builder Grid.
- Perform one of the following actions:
- Click View4Query Builder Grid.
- Click
.
These actions function as a toggle. That is, if Query Builder Grid is hidden, the action shows it, and vice versa. See also Behavior of Query Builder Grid When Query Builder Diagram Contains No Tables .
To set query type for Query Builder
This task requires that Query Builder Diagram or Query Builder Grid be active (showing).
- Click Tools4Query Builder4Change Query Type or click
.
- Perform one of the following actions:
- Click OK.
To build a SELECT statement with Query Builder
This task serves as a mini-tutorial on how to build an SQL statement with Query Builder. This task addresses building a SELECT statement, but many of the actions also apply to building an UPDATE, INSERT, or a DELETE statement. For this reason, we suggest that you complete this task before attempting to build one of the other statement types.
This task presents the steps to accomplish the following:
- Obtain the ID number, first name, and last name of all persons in your database with a first name of "James" or "Lisa" and whose last name begins with an "N," "O," "P," "Q," "R," "S," or "T." Once obtained, the records need to be sorted by ascending ID number.
- Determine from your database the average amount owed by the students.
- Find which persons in your database are also on the faculty, and determine the department in which the faculty member teaches and the salary of the faculty member.
The database used for this task is the sample database provided with Pervasive.SQL, named DEMODATA. DEMODATA is located, by default, in the folder PVSW\demodata.
This task assumes the following:
- You have reviewed these sections in this chapter: SQL Data Manager Concepts and SQL Data Manager GUI Visual Reference .
- SQL DM is running (see To start SQL DM as a stand-alone application or To start SQL DM from PCC )
- The database DEMODATA is open (see To open a database )
- Both Query Builder Diagram and Query Builder Grid are hidden (see To show or hide Query Builder Diagram and To show or hide Query Builder Grid )
- No tables are open in Query Builder Diagram (see To remove a table from Query Builder Diagram ).
Your first goal is to obtain the ID number, first name, and last name of all persons in your database with a first name of "James" or "Lisa" and whose last name begins with an "N," "O," "P," "Q," "R," "S," or "T." Once you have the correct records, you need to sort them by ascending ID number.
- Click View4Query Builder Diagram or click
.
The Add Table dialog, the Query Builder Diagram, and the Query Builder Grid appear.
- Click "Person" in the tables list then click Add.
- Click Close.
The SQL statement is started in Query Pane as soon as you add a table to Query Builder Diagram. SQL DM should show something similar to the following:
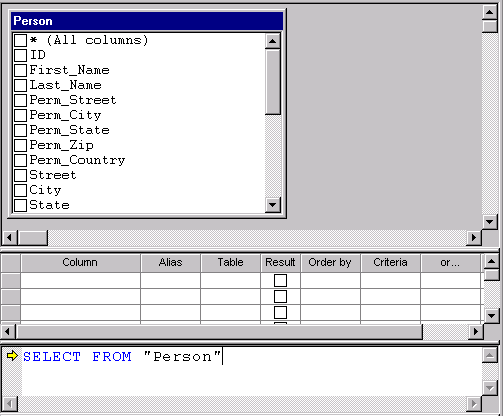
If you see a different type of grid, then you need to set Query Builder to build a SELECT statement. The next two steps show you how. Complete both steps even if you see the same type of grid.
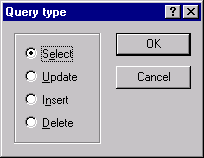
- Click Tools4Query Builder4Change Query Type or click
.
- Click Select then OK.
- In Query Builder Diagram, click the columns ID, First_Name, and Last_Name for table Person.
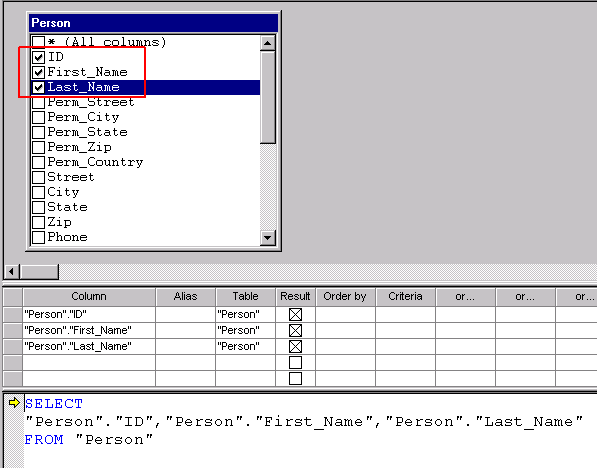
Notice that the columns appear in the grid and that the SQL statement in Query Pane continues to be built.
- In the Alias column for "Person"."ID," "Person"."First_Name," and "Person"."Last_Name," type the following, respectively:
Note
You must indicate to Query Pane that you are finished typing into a grid cell. You do this by moving the cursor from the cell once you have finished typing. For example, after you type "Last Name," move the cursor from that cell with the Tab key, cursor arrows, or mouse.
- In the Criteria column for "Person"."First_Name," type James.
- Press the Tab key.
Notice that Query Builder automatically adds an equals sign and single quotes around 'James' because "James" is a string data type. Non-string data types are not enclosed by quotes.

- In the Or cell beside 'James,' type Lisa and press the Tab key.
SQL DM should show something similar to the following:

At this point, run the SQL statement to see what results are returned.
- Click Tools4Query4Run Current SQL Statement in Grid or click
.
The statement returns 24 records where first name equals "James" or "Lisa." But your goal also requires the records where the last name begins with an "N," "O," "P," "Q," "R," "S," or "T." You obtain the last name information by using a logical AND.

Also notice that the Aliases you specified appear as the column headings on the Grid Results tab.
Optional: If you want to view the results as text, click Tools4Query4Run Current SQL Statement in Text or click
.
Click the Grid Result tab after you finish viewing the text results.
- In the Criteria column for "Person"."Last_Name," type >=N (greater than or equal to N) and press the Tab key.

Notice that the grid does not contain an AND column. You create a logical AND by adding the same database column to the grid and specifying the additional criteria.
- Position the mouse pointer in the empty cell below "Person"."Last_Name" then press and hold down the left mouse button. A list of available database columns appears.

- Click "Person"."Last_Name" in the list.
- Press the Tab key 5 times to position the cursor to the Criteria column.
- In the Criteria cell, type <=T and press the Tab key.
SQL DM should show something similar to the following:
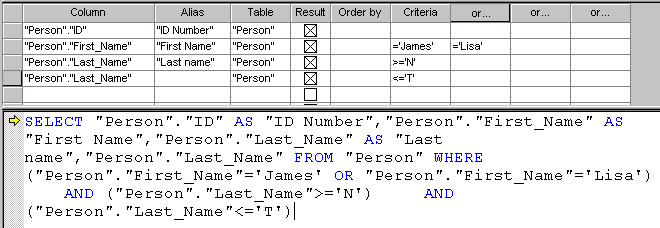
Notice that the SQL statement now contains the AND clauses for last name.
- Click Tools4Query4Run Current SQL Statement in Grid or click
.
This time, the statement returns 10 records, but the records are not sorted. Their order is the sequence in which they were added to the database.

You are almost finished with your first goal! All you have remaining is to sort the records by the person ID numbers.
- Position the mouse pointer in the Order by cell for "Person"."ID," then press and hold down the left mouse button.

- Click Ascending in the list then press the Tab key.
The ORDER by clause is added to the SQL statement. Notice that the ascending symbol is added to the Person table for the ID column.

- Click Tools4Query4Run Current SQL Statement in Grid or click
.
The statement returns 10 records but now they are sorted in ascending sequence by ID number.
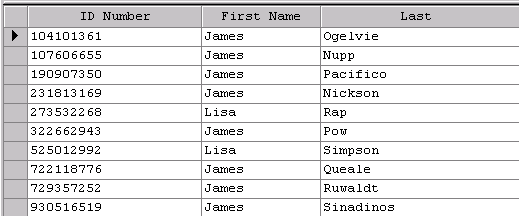
You have now completed your first goal for this task. Your next goal is to determine from your database the average amount owed by the students. You determine this with an aggregate query that uses a Group By clause. The "Person" table does not contain the data you need so you are finished with it.
- In Query Builder Diagram, right-click on the title bar of the "Person" table, then click Remove.
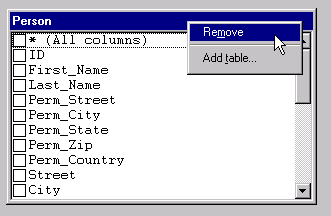
- Right-click in the Query Builder Diagram, then click Add table.
- On the Add Table dialog, click "Billing," then Add, then Close.
SQL DM should show something similar to the following:
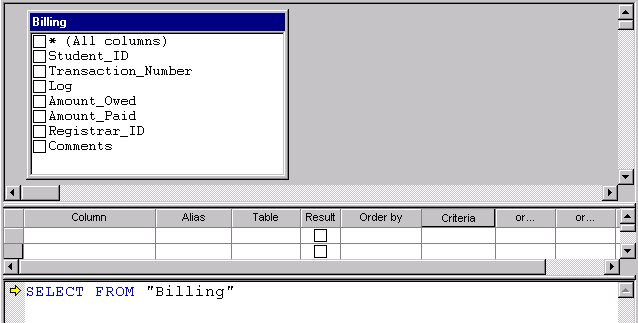
- In Query Builder Diagram, click the column Amount_Owed.
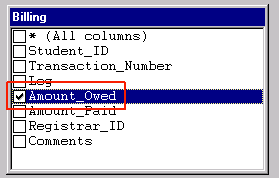
- Click Tools4Query Builder4Group By or click
.
The Group By column appears on the grid, the Group By symbol is added to the "Billing" table for the Amount_Owed column, and the SQL statement now contains a Group By clause.
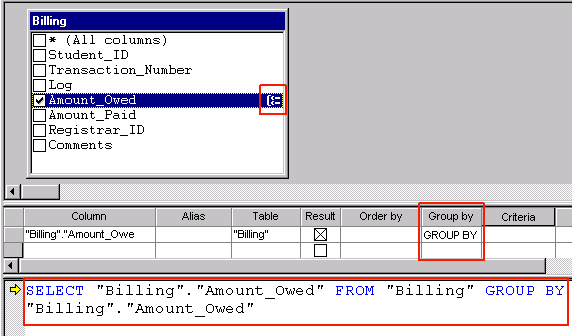
- Position the mouse pointer in the Group by cell for "Billing"."Amount_Owed," then press and hold down the left mouse button.
- Click AVG (for average) from the list then press the Tab key.
Query Pane now contains a query that determines the average amount owned by students.

Notice that the Group By part of the clause went away when an aggregate function (AVG) was specified for the column. If you also want to group by the column, position the mouse pointer in the empty cell below "Billing"."Amount_Owed," then press and hold down the left mouse button. From the list, click "Billing"."Amount_Owed." The Group by column shows GROUP BY and the statement in Query Pane contains a GROUP BY clause.

In other words, you need one line in Query Builder Grid for each aggregate function or Group By clause that you want in the SQL statement.
- Click Tools4Query4Run Current SQL Statement in Grid or click
.
The average amount owed by students is $2,894.26.

Notice that the column heading for the output is EXPR_1. What if you wanted the heading to read "Average Amount Owed." What would you change on Query Builder Grid to produce this result? You would type "Average Amount Owed" as an Alias for "Billing"."Amount_Owed." Do that and run the statement again to see if the heading changes.
You have now completed your second goal for this task. Your last goal is to find which persons in your database are also on the faculty, and determine the department in which the faculty member teaches and the salary of the faculty member.
Because you now have some experience using Query Builder, the steps for this goal are more generic and contain fewer images of the GUI. If you are unsure how to complete a step, review the previous steps in this task.
- Remove the "Billing" table from Query Builder Diagram and add the tables "Person" and "Faculty."
- In Query Builder Diagram, click the columns ID, First_Name, and Last_Name for table "Person."
- In Query Builder Diagram, click the columns ID, Dept_Name, and Salary for table "Faculty."
SQL DM should show something similar to the following:
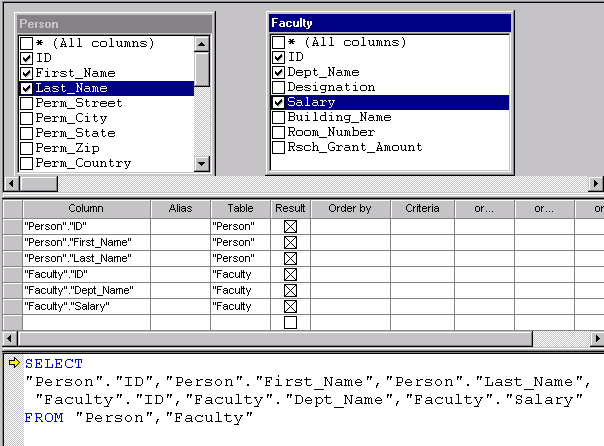
You are now ready to join the two tables with the ID column. The join allows you to determine which faculty members are also in the Person table. The following steps show you how to join the columns by dragging the column from one table to the corresponding column in the other column.
- In Query Builder Diagram, click ID and keep the left mouse button held down.
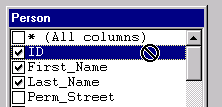
- "Drag" the ID column to the Faculty ID column:
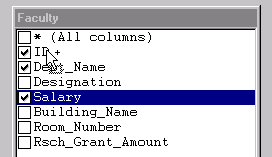
- Release the mouse button.
A join line appears between the two tables:
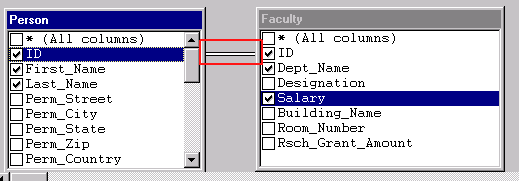
Notice that the JOIN syntax is not used in the SQL statement. Instead, a WHERE clause is added:

- Click Tools4Query4Run Current SQL Statement in Grid or click
.
The statement returns 95 records. Your manager arrives and reviews the results. Your manager tells you to remove the salary information because it is not needed. How do you do this?
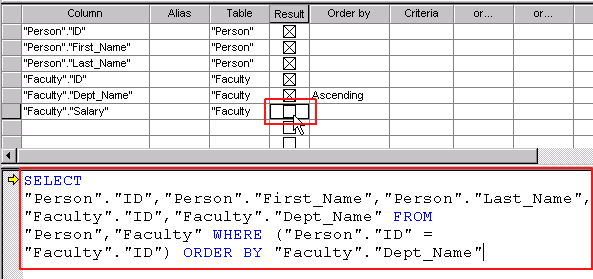
- In Query Builder Grid, click on the Result option for "Faculty"."Salary."
This action removes the "X" from the option and also removes the Salary part from the selection list in the SQL statement.
- Run the query again.
To build an UPDATE statement with Query Builder
This task assumes the following:
- You have completed the task To build a SELECT statement with Query Builder . That tasks contains how-to information that is not covered again in this task.
- You have reviewed these sections in this chapter: SQL Data Manager Concepts and SQL Data Manager GUI Visual Reference .
- SQL DM is running (see To start SQL DM as a stand-alone application or To start SQL DM from PCC )
- The database DEMODATA is open (see To open a database )
- Both Query Builder Diagram and Query Builder Grid are hidden (see To show or hide Query Builder Diagram and To show or hide Query Builder Grid )
- No tables are open in Query Builder Diagram (see To remove a table from Query Builder Diagram ).
Your goal for this task is to change the time at which Psychology 101 begins to 10:30 am and reduce its maximum class size to 175. Before you make the changes, however, look at the information for this class.
- Set Query Builder to build a SELECT statement (change the query type to "Select.")
- Add table "Class" to Query Builder Diagram.
- Click the column * (All columns) then run the SQL statement for output to the Grid Results tab.
SQL DM should show something similar to the following:
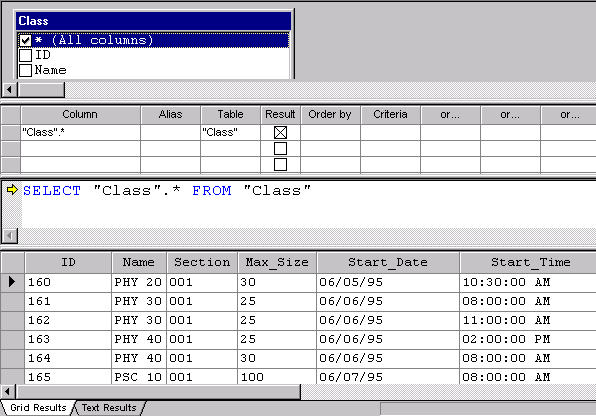
- Scroll the results grid until you see the record for Psychology 101 that has a start time of 11:00 am.

This is the record you want to change. Notice that its ID is 173.
- Activate word wrap in Query Pane if it is not already activated.
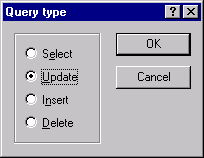
- Set Query Builder to build an UPDATE statement:
- In Query Builder Diagram, click the columns ID, Name, Max_Size, and Start_Time.
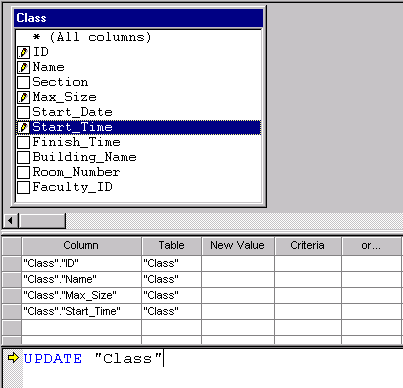
Notice that the
symbol appears in the table window instead of the
symbol that appears for a SELECT statement.
- In the Criteria column for "Class"."ID," type 173 and press the Tab key.
- In the Criteria column for "Class"."Name," type PSY 101 and press the Tab key.
You could build your statement without the class name because the class ID uniquely identifies the record. For clarity to someone reading the SQL statement, though, include the class name.
- In the New Value column for "Class"."Max_Size," type 175 and press the Tab key.
- In the New Value column for "Class"."Start_Time," type '10:30:00' and press the Tab key (remember to use single quotes around the time).
SQL DM should show something similar to the following:

- Click Tools4Query4Run Current SQL Statement in Text or click
.
The Text Results tab contains the following result:
SQL statement (script) has executed successfully. 1 row(s) were affected.Now look at the data in the "Class" table again to verify that you changed the record.
- Set Query Builder to build a SELECT statement (change the query type to "Select.")
- Click the column * (All columns) then run the SQL statement for output to the Grid Results tab.
- Scroll the results grid until you see the record for Psychology 101 with ID 173.
Notice that the maximum class size is now 175 and the start time is 10:30 am.

To build an INSERT statement with Query Builder
This task assumes the following:
- You have completed the task To build a SELECT statement with Query Builder . That tasks contains how-to information that is not covered again in this task.
- You have reviewed these sections in this chapter: SQL Data Manager Concepts and SQL Data Manager GUI Visual Reference .
- SQL DM is running (see To start SQL DM as a stand-alone application or To start SQL DM from PCC )
- The database DEMODATA is open (see To open a database )
- Both Query Builder Diagram and Query Builder Grid are hidden (see To show or hide Query Builder Diagram and To show or hide Query Builder Grid )
- No tables are open in Query Builder Diagram (see To remove a table from Query Builder Diagram ).
Your goal for this task is to add a new philosophy class to the database. Before you make the change, however, look at the information for the existing courses.
- Set Query Builder to build a SELECT statement (change the query type to "Select.")
- Add table "Course" to Query Builder Diagram.
- Click the column * (All columns) then run the SQL statement for output to the Grid Results tab.
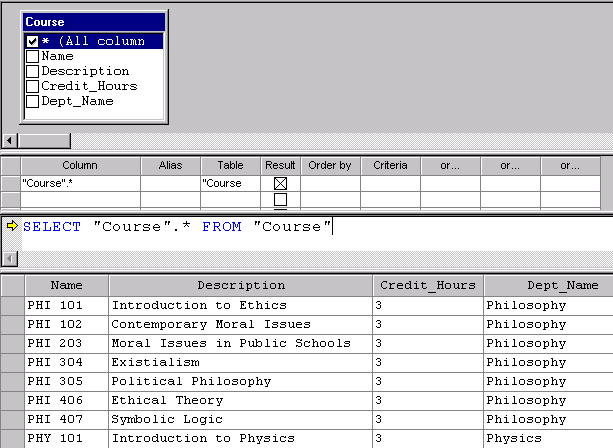
- Scroll the results grid until you see the records for Philosophy.
SQL DM should show something similar to the following:
- Activate word wrap in Query Pane if it is not already activated.
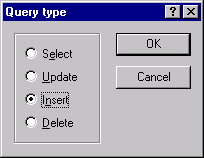
- Set Query Builder to build an INSERT statement:
- In Query Builder Diagram, click the columns Name, Description, Credit_Hours, and Dept_Name.
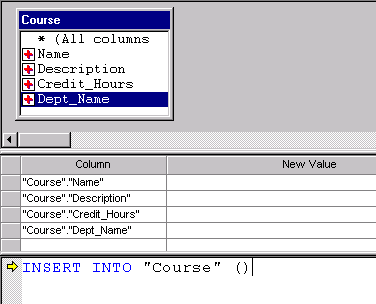
- In the New Value column for "Course"."Name," type PHI 201 and press the Tab key.
- In the New Value column for "Course"."Description," type Ethics of Accounting Practices and press the Tab key.
- In the New Value column for "Course"."Credit_Hours," type 3 and press the Tab key.
- In the New Value column for "Course"."Dept_Name," type Philosophy and press the Tab key.
SQL DM should show something similar to the following:

Note that when you perform an INSERT, you must provide a value for all columns that cannot be null. For the Course table, "Course"."Name" and "Course"."Dept_Name" must contain values. For practice, however, this task has you provide values for all four columns.
- Click Tools4Query4Run Current SQL Statement in Text or click
.
The Text Results tab contains the following result:
SQL statement (script) has executed successfully. 1 row(s) were affected.Now look at the data in the "Course" table again to verify that you inserted the record.
- Set Query Builder to build a SELECT statement (change the query type to "Select.")
- Click the column * (All columns) then run the SQL statement for output to the Grid Results tab.
- Scroll the results grid until you find the record you inserted, PHI 201.
The philosophy class you inserted is now part of the table.

To build a DELETE statement with Query Builder
This task assumes the following:
- You have completed the task To build a SELECT statement with Query Builder . That tasks contains how-to information that is not covered again in this task.
- You have reviewed these sections in this chapter: SQL Data Manager Concepts and SQL Data Manager GUI Visual Reference .
- SQL DM is running (see To start SQL DM as a stand-alone application or To start SQL DM from PCC )
- The database DEMODATA is open (see To open a database )
- Both Query Builder Diagram and Query Builder Grid are hidden (see To show or hide Query Builder Diagram and To show or hide Query Builder Grid )
- No tables are open in Query Builder Diagram (see To remove a table from Query Builder Diagram ).
Your goal for this task is to remove from the database classroom 100 in the Boerner Building. Before you make the changes, however, look at the information for the existing classrooms.
- Set Query Builder to build a SELECT statement (change the query type to "Select.")
- Add table "Course" to Query Builder Diagram.
- Click the column * (All columns) then run the SQL statement for output to the Grid Results tab.
- Scroll the results grid until you see the records for the Boerner Building.
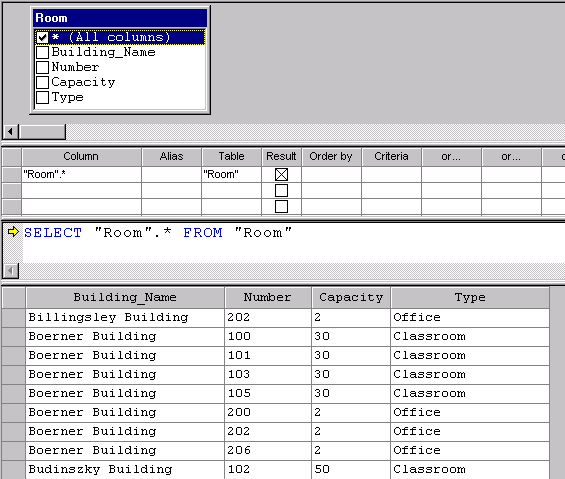
Notice that room 100 is one of the rooms listed in the Boerner Building.
- Activate word wrap in Query Pane if it is not already activated.
- Set Query Builder to build a DELETE statement:
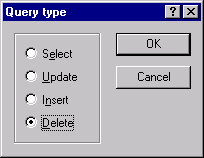
Notice in the table window that none of the columns are selectable for a DELETE statement.You cannot delete individual columns so check boxes do not appear in the table window. Instead of selecting columns, you specify the criteria in Query Builder Grid for the rows you want to delete, as explained next.
- In the Query Builder Grid, specify that you want to work with columns "Room"."Building_Name" and "Room"."Name." (Remember to press the Tab key to move from the "Room"."Name" cell.)
SQL DM should show something similar to the following:
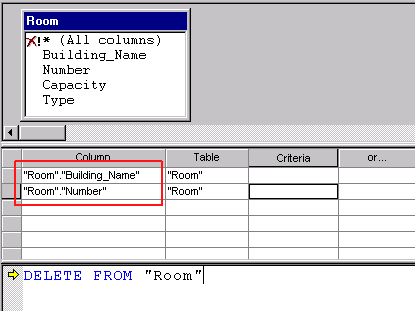
Why do you need both the building name and the room number? The "Room" table contains several records for the Boerner Building. If your only deletion criteria was building name, you would delete records you need to keep. Similarly, "Room" contains records for room 100 in other buildings, so you would not want to delete all rooms with room number 100.
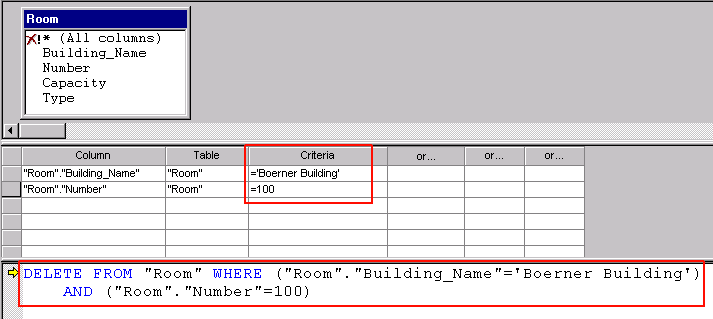
- In the Criteria column for "Room"."Building_Name," type Boerner Building and press the Tab key.
- In the Criteria column for "Room"."Number," type 100 and press the Tab key.
SQL DM should show something similar to the following:
- Click Tools4Query4Run Current SQL Statement in Text or click
.
The Text Results tab contains the following result:
SQL statement (script) has executed successfully. 1 row(s) were affected.Now look at the data in the "Room" table again to verify that you deleted the record.
- Set Query Builder to build a SELECT statement (change the query type to "Select.")
- Click the column * (All columns) then run the SQL statement for output to the Grid Results tab.
- Scroll the results grid until you see the records for the Boerner Building.
Notice that room 100 is no longer listed as one of the classrooms for the Boerner Building.

To add a table to Query Builder Diagram
This task requires that Query Builder Diagram be active (showing).
See also Behavior When Query Builder Diagram Contains No Tables .
To remove a table from Query Builder Diagram
This task requires that Query Builder Diagram be active (showing).
To join tables in Query Builder Diagram
See steps 32 through 34 in To build a SELECT statement with Query Builder for an example of joining tables.
To insert a row into Query Builder Grid
This task requires that Query Builder Grid be active (showing).
- Right-click on the row that you want to move down.
- Click Insert Row.
The inserted row is placed above the row that contained the cursor.
To clear the contents of a row(s) on Query Builder Grid
This task requires that Query Builder Grid be active (showing).
- Right-click on the row that you want to clear.
- Click Clear Row(s).
The clear action removes the values from all of the grid cells for that row, but leaves the empty row in the grid. The SQL statement in Query Pane is rebuilt.
You may also select and clear multiple rows. To select multiple rows, press and hold down the Shift or Control key, then click the indicator column for the desired rows. Once the desired rows are selected, right-click and click Clear Row(s).
The indicator column is the leftmost column in the grid:

To delete a row(s) from Query Builder Grid
This task requires that Query Builder Grid be active (showing).
- Right-click on the row that you want to delete.
- Click Delete Row(s) (or press the Delete key).
The delete action removes the row in the grid. The SQL statement in Query Pane is rebuilt.
You may also select and delete multiple rows. To select multiple rows, press and hold down the Shift or Control key, then click the indicator column for the desired rows. Once the desired rows are selected, right-click and click Delete Row(s) (or press the Delete key).
The indicator column is the leftmost column in the grid:

To add a Group By column to Query Builder Grid
See steps 25 through 27 in To build a SELECT statement with Query Builder for an example of adding a Group By column.
| Prev SQL Data Manager GUI Visual Reference |
Contents Up Check for Revisions | Next Pervasive System Analyzer (PSA) |