

| Prev | User's Guide | Next |
SQL Data Manager Concepts
This section contains the following topics:
Overview
SQL Data Manager (SQL DM) allows you to run Structured Query Language (SQL) statements against a Pervasive.SQL database. With SQL statements, you may retrieve, create, change, or delete data in a database provided you have the proper database permissions to perform these actions. The SQL statements that you may use with SQL DM are documented in SQL Engine Reference.
SQL DM includes a graphical user interface (GUI) that runs only on Windows 32-bit platforms. You may start the GUI as a stand-alone application or from within Pervasive Control Center (PCC).
Caution
Backup all your data definition files (DDFs) and data files before you perform functions through SQL DM. This tool gives you the ability to modify your database table definitions and data. You could inadvertently change your files in an irreversible manner. Full recovery is possible if you have performed a backup.
SQL DM contains four primary work areas (see Figure 6-1):
This section discusses the primary areas in detail. See SQL Data Manager GUI Visual Reference to identify other objects in the GUI, such as menu commands, toolbar icons, and so forth.
Figure 6-1 Primary Areas of SQL DM Graphical User Interface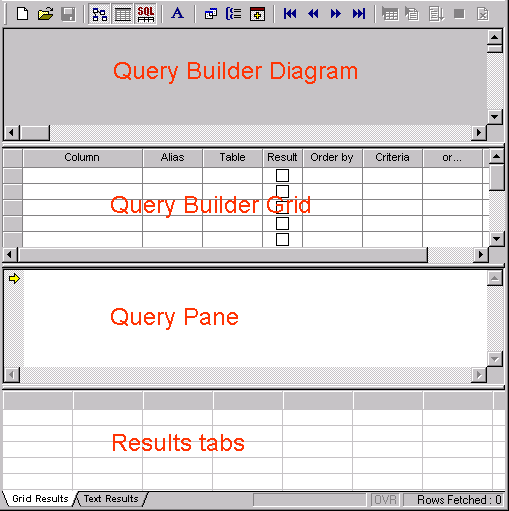
Restrictions
The following actions and SQL statements are not supported in SQL DM:
- Creating a database
- Use of dynamic parameters (indicated by a question mark)
- COMMIT and START TRANSACTION
- SET SECURITY.
Results Tabs
SQL DM contains two tabbed views that are used to display the results of running SQL statements:
The tabbed views always appear; you may select one or the other but cannot hide them.
Figure 6-2 SQL DM Results Tabs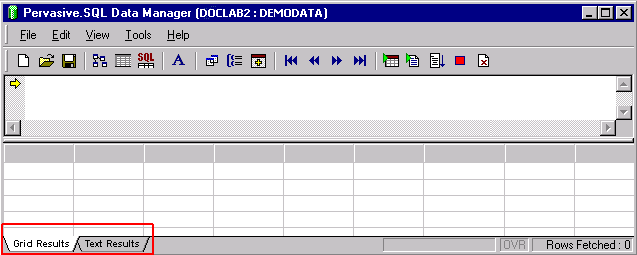
Grid Results Tab
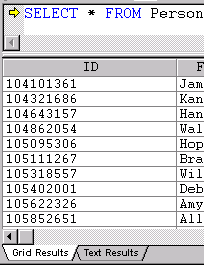
The Grid Results tab shows in a matrix format, like a spreadsheet, the result of running SQL statements. Each field is represented as a column and the data appears in cells within the columns. The grid is used only for the results of SELECT statements (statements that return data).
Figure 6-3 Grid Results Tabbed Dialog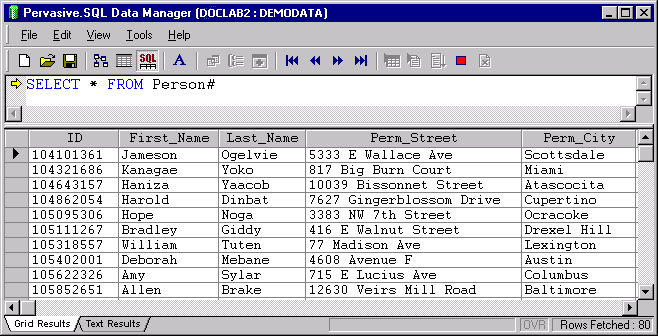
Grid States
The results grid has two states: active and display-only. The active state allows you to directly change database data by changing the values in the grid cells. You must have the proper table permissions to affect the database data. See To add a new user to the database , which explains how to set permissions for a user.
The active state is indicated by a gray indicator column on the very left of the grid.
Table 6-1 Comparison of Active and Display-only Grid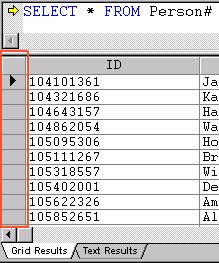
The indicator column uses icons to inform you which row is active (contains the cursor) or whether data has changed in that row.
Table 6-2 Icons in Results Grid Indicator Column

When the grid is in the display-only state, you cannot change the values in grid cells. The display-only state also lacks the indicator column. By default, SQL DM starts with the Results Grid as the active tab and the grid in the active state.
For tasks that allow you to change the grid state, see To set Grid Results to allow changes to database data and To set default behavior for Grid Results tab .
Note
If you have a table without primary keys that contains records with duplicate data for a column, you will be unable to update the duplicate data on the Grid Results tab. SQL DM cannot tell one record from another because of the duplicate data. This problem does not occur if your table contains primary keys because they prevent duplicate data.
Records Affected and Scrolling
Regardless of state, the grid caches results locally and initially displays as many records as the vertical size of the grid permits. The larger you size the main window and the larger the vertical size of the grid within it, the more records the grid can initially display.
As you scroll the vertical scroll bar, more records are made available to the grid. The number of records retrieved appears in the lower right corner of the main window (in the "rows fetched" indicator).

Once you scroll to the bottom, the rows fetched indicator reports the total number of records returned by the SQL statement.
Once scrolled to the bottom and released, the scroll box then displays a tool tip for all subsequent scrolling. The tool tip tells you which record is positioned at the top of the visible grid. For example, the following figure shows that record 570 in the current table is the top line of the visible grid.
Figure 6-4 Scroll Box Tool Tip Indicating Row at Top of Grid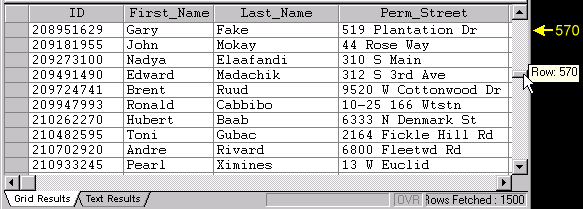
Text Results Tab
The Text Results tab shows in a text format the result of running SQL statements. You cannot change the data values in the database by changing the text.
The Text Results tab is automatically used for the results of any SQL statement that is not a SELECT statement. For example, suppose you want to delete some records and have typed a DELETE statement into Query Pane. If you select the menu command Run Current SQL Statement in Grid, SQL DM returns the results to the Text Results tab, not to the Grid Results tab.
You may also use the Text Results tab for SELECT statements to show data returned. The data returned appears in a columnar format with each field represented as an underlined heading. The length of the underline (number of characters) reflects the field width. The data appears as rows below the headings, left aligned with each heading.
Figure 6-5 Text Result Tab View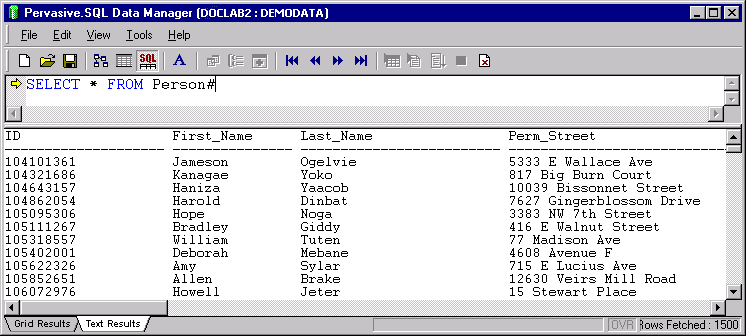
If you stop the execution of SQL statements, or if execution stops because of an error, the Text Results tab lists the statement that was last run. Knowing the last statement run can help you troubleshoot problems. See To stop running SQL statements and To continue running SQL statements that were stopped .
Panes
SQL DM contains three panes that you use as the primary work areas (see Figure 6-1):
Unlike the tabbed dialogs, each pane may be individually shown or hidden. Each pane may be sized vertically within the SQL DM main window.
Together, Query Builder Diagram and Query Builder Grid compose what is called Query Builder.
Query Pane
Query Pane is a text entry area for SQL statements. You may type directly in the pane, add SQL statements to the pane from Query Builder, or combine both methods. By default, text does not wrap within Query Pane. You may turn on word wrap if you choose. See To wrap text within Query Pane .
If you add more than one SQL statement in Query Pane, you must separate each statement with a delimiter. By default, SQL DM uses the pound sign (#). You may change this delimiter character to the semicolon (;). See To set SQL statement separator . Note that you must use the pound sign as the statement delimiter in Query Pane if you create stored procedures. Stored procedures use the semicolon as a statement delimiter within the procedure itself.
You may run the current statement or all statements in Query Pane. See To run a single SQL statement and To run all SQL statements . The statement in which the cursor is located is the current statement, and is indicated by a yellow arrow in the left margin.

Comments within Query Pane are indicated by double dashes (--). See To type comments into Query Pane .
By default, SQL DM starts with Query Pane shown.
Cursor Movement Within Query Pane
You have two options when you move the cursor from statement to statement within Query Pane:
- Move the cursor only (with the mouse or keyboard arrow keys). See To move the cursor within Query Pane without running any SQL statements ).
- Move the cursor (with the toolbar icons) and run the SQL statement to which it moves. See To move the cursor within Query Pane and run the SQL statement to which it moves .
The second option is a convenience that lets you perform two actions with one mouse click. (This option is particularly handy if you want to "step" through SQL statements.)
Query Builder
Query Builder allows you to create SQL statements (database queries) without directly writing SQL. Query Builder comprises Query Builder Diagram and Query Builder Grid.
You will find Query Builder most useful if you are new to writing SQL or if you want to check a syntactically correct form of a statement. If you are experienced with writing SQL, you will probably prefer to type your statements directly into Query Pane. Query Builder Diagram works best for creating relatively simple queries.
You may create the following types of SQL statements with Query Builder:
- SELECT (see To build a SELECT statement with Query Builder )
- UPDATE (see To build an UPDATE statement with Query Builder )
- INSERT (see To build an INSERT statement with Query Builder )
- DELETE (see To build a DELETE statement with Query Builder ).
A SELECT statement retrieves data from one or more tables. An UPDATE statement changes the values of columns in one or more existing rows in a table. An INSERT statement creates a new row in a table and inserts values into specified columns. A DELETE statement removes one or more rows from a table.
Mixing Use of Typed Statements and Built Statements
You may mix the use of statements that you type into Query Pane and statements added by Query Builder. For example, you could begin a statement with Query Builder, then manually type additional syntax. Note, however, that Query Builder is not aware of what you add manually to Query Pane. This means that the next time Query Builder adds to the statement being build, your manually added portion will be removed.
An example helps clarify this. Suppose you use Query Builder to build a simple SELECT statement. You then type a WHERE clause into Query Pane. The statement is valid and may be run (provided the syntax you typed is correct). If you then use Query Builder to continue building your statement, your manually typed WHERE clause will be removed.
If you wish to keep what is in Query Pane, you may save the statements to an ASCII file (called a query script). See To save an SQL query as a script and To open an SQL script .
Query Builder Diagram
Query Builder Diagram allows you to open tables and select columns to which the SQL statements apply. If shown, Query Builder Diagram always appears as the first pane below the main window toolbar. (See Figure 6-1 .) By default, when you start SQL DM, only Query Pane is shown (and the Grid Results tab is the active tab).
Query Builder Diagram represents a table as a window within the Diagram pane. The title bar of the window contains the name of the table. For example, Figure 6-6 shows that tables "Class" and "Faculty," from the DEMODATA sample database, have been added to Query Builder Diagram.
Figure 6-6 Query Builder Diagram with Tables Class and Faculty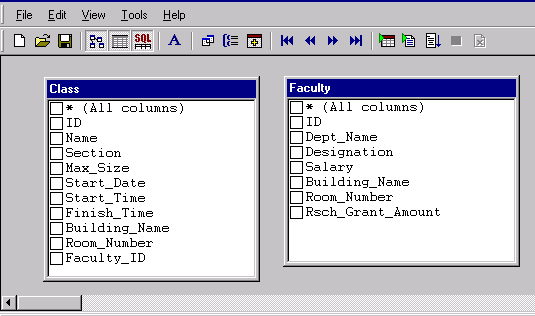
Each table window shows the columns within that table. For SELECT, UPDATE, and INSERT statements, the window contains check boxes that allow you select columns. The following table explains the symbols used within a table window.
Behavior When Query Builder Diagram Contains No Tables
If Query Builder Diagram contains no tables (such as the first time you show Query Builder Diagram for a particular session of SQL DM), the following occurs:
Actions 2 and 3 occur as a convenience. Query Builder Diagram works in tandem with Query Builder Grid. The Grid lets you further specify the conditions that create the SQL statement. Query Builder Diagram also requires tables, so it makes sense to let you select the initial tables with which you want to work.
If Query Builder Diagram contains one or more tables, Query Builder Diagram and Query Builder Grid must be shown (or hidden) independently. See To show or hide Query Builder Diagram and To show or hide Query Builder Grid .
The following image shows what occurs if you show Query Builder Diagram for the sample database DEMODATA and Query Builder Diagram contains no tables:
- The Add Table dialog appears.
- Query Builder Diagram appears.
- Query Builder Grid appears, showing the grid for a SELECT statement.
- Query Pane appears.
- Grid Results tab is active.
Figure 6-7 Results of Showing Query Builder Diagram Containing No Tables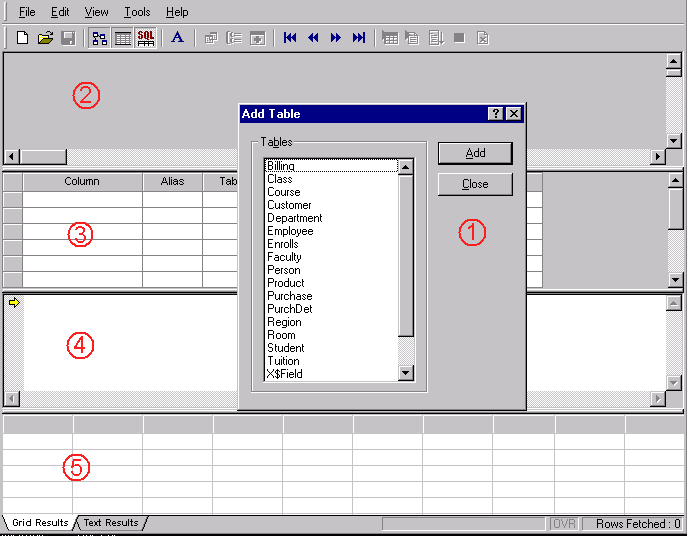
Query Builder Diagram allows you to create an inner join between tables by clicking on a column in one table and dragging the column to a corresponding column in another table. A join line then appears between the two table windows. Each pair of columns connected in this manner contains its own join line, so two tables may show one or more join lines. Note that the SQL statement created uses a WHERE clause and not the JOIN syntax.
The following image shows a join line between columns "ID" in tables "Faculty" and "Person."
Figure 6-8 Example of Join Line Between Columns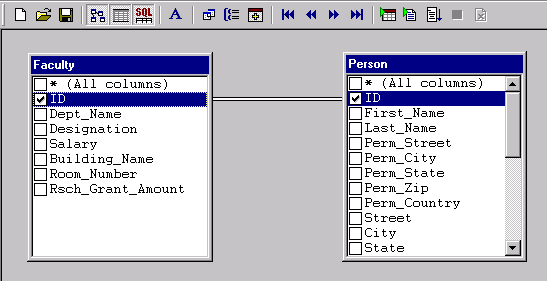
Query Builder Grid
Query Builder Grid lets you refine an SQL statement based on the tables and selected columns in Query Builder Diagram. The Grid allows you to specify query options for the SQL statements, such as which columns to include in the results, how to order the results, the criteria for the statement, and so forth.
Query Builder Grid always appears as the first pane below Query Builder Diagram (if shown). See Figure 6-1 . If Query Builder Diagram is hidden, Query Builder Grid appears as the first pane below the main window toolbar.
Each of the four types of SQL statement that you can build with Query Builder uses a Query Builder Grid specific for that type. Each grid contains input columns appropriate for the type of statement being built. For an explanation of the input columns for each grid, see the following:
- Query Builder Grid for SELECT Statements
- Query Builder Grid for UPDATE Statements
- Query Builder Grid for INSERT Statements
- Query Builder Grid for DELETE Statements .
For an explanation of using each grid to create an SQL statement, see the following:
- To build a SELECT statement with Query Builder
- To build an UPDATE statement with Query Builder
- To build an INSERT statement with Query Builder
- To build a DELETE statement with Query Builder .
Behavior of Query Builder Grid When Query Builder Diagram Contains No Tables
The same behavior occurs as explained in Behavior When Query Builder Diagram Contains No Tables .
SQL Reference
The SQL statements and key words that you may use with SQL DM are documented in SQL Engine Reference. The following table lists the Pervasive.SQL SQL statements and keywords.
SQL DM does not support the use of the following statements:
| Prev SQL Data Manager |
Contents Up Check for Revisions | Next SQL Data Manager GUI Visual Reference |