

| Prev | User's Guide | Next |
Setting Up Database Access on Windows
To Set Up Database Access on Windows
Note
If you have not done so already, review Prerequisites to Setting up Database Access before proceeding.
- Open Pervasive Control Center (PCC):
Start4Programs4Pervasive.SQL V84Control Center.- Double-click on Pervasive.SQL Engines.
The PCC Namespace contains a list of database engines that have been registered.
If you do not see the name of the database engine to which you want to connect, you must register the remote engine with PCC. To do so, right-click Pervasive.SQL Engines then click Register New Engine.
Figure 2-7 Registering a New Engine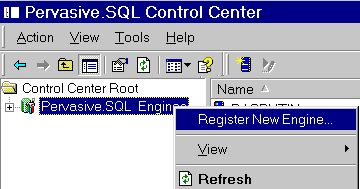
A dialog is displayed that allows you to choose the machine name where the Pervasive.SQL engine resides.
Figure 2-8 Choosing a Computer Name
- Do one of the following:
- Type a computer name in the Computer name field and click OK.
- If you are unsure of the computer name, click the button located to the right of the name field and browse from the Network list that appears. Click on the desired computer name, then click OK.
Figure 2-9 Choosing a Computer Name from a Network List
- Back in the main screen of PCC, double-click the icon representing the engine you are working with. Then double-click the Databases folder associated with the selected engine.
- Inspect the databases that are listed to determine whether the database you wish to access has already been set up with an Engine DSN.
If the database you wish to access is visible, then it already has an Engine DSN. You are finished with this procedure. Go to Setting Up Client Access for instructions on how to set up the client machines with Client DSNs.
If you do not see the database you wish to access, proceed with step 6.
- Create a New Database for the engine:
Right-click on the database folder underneath the engine name, then click New Database.If you are working with a Server engine and you are not logged into the server as a user with system administrator permissions, you see the login screen shown below.
Figure 2-10 Create an Engine DSN and Connect to a Server Database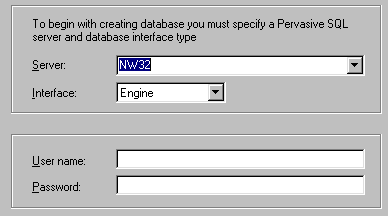
If you are using Workgroup engine, or you are using the server console or are already logged into the server with system administrator permissions, skip to step 8 as shown in Figure 2-11.
- The Server: field should indicate the server that you are currently working with. Choose Engine for the Interface type, and enter your operating system user name and password for that server, in the User name and Password boxes.
Remember that you must have full administrator-level rights on the server operating system to be able to complete this task.
- In the Name field, specify an Engine DSN name for the database. This name will appear in the database listing in PCC after you complete this task.
In the Directory field, specify the location of the data files.
Figure 2-11 Naming the New Database on the Server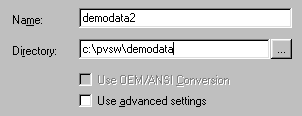
Note
If you are working with a Server engine, you must specify a full path (not a mapped drive) that makes sense on the server. The Server engine cannot interpret mapped drive paths. For example, if you have a mapped drive S:\data1\datafiles on your client, referring to the folder C:\servers\data1\datafiles on the server, you must enter the server-based directory, C:\servers\data1\datafiles.
If you wish to use any advanced features, such as specifying that the DDFs and data files are not located in the same directory, that the DDFs and data files are located in multiple directories, or modifying the default DBNAME settings, you must click the Use advanced settings option.
- Click Next. If you clicked the Use advanced settings option, proceed to step 11.
The final wizard step verifies the successful creation of the database.
- Click Finish.
The database is ready to access. If you just created a Server DSN for the database engine, you must proceed to setting up client DSNs on each client workstation as explained in Setting Up Client Access .
Advanced settings procedure
- If you clicked the Use advanced settings option, you see a window as shown below.
Figure 2-12 Advanced Settings Window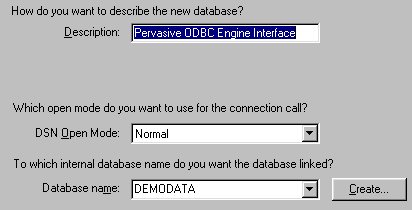
- In the Advanced Settings window, you can type a description for the new database.
In the DSN Open Mode field, choose Normal unless you have reviewed the other options as described in Advanced Operations Guide.
In the Database name field, choose the DBNAME of the database for which you wish to create the Engine DSN. If you find the DBNAME you want, click Next and return to step .
If the DBNAME you want to access is not listed, click the Create button to create an internal DBNAME for the database. Click Next.
Figure 2-13 Create DBNAME Window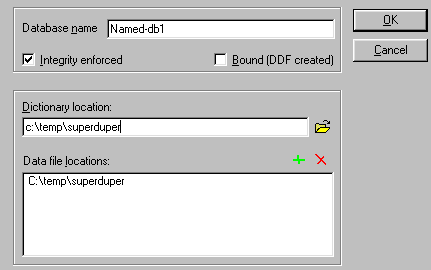
- In the Database Name field, type in the internal name you want to assign to the database. This name does not need to be the same as the DSN. This name is not displayed in PCC nor is it exposed to users trying to connect to the database during runtime.
Leave Integrity enforced checked if you plan to enforce the referential integrity rules defined in the database. Usually it is a good idea to do so.
Click Bound (DDFs created) if you want to prevent any other databases from being associated with these DDFs and data files. Checking this option creates a new set of empty DDFs. Do not click this option if you are setting up access to an existing database.
In the Dictionary location box, type or select the location of the DDFs. This location can be the location of existing DDFs if you are setting up an existing database for use with ODBC, or it can be an empty directory if you are creating a new database.
- For Server databases, this must be a full path name on the server-do not enter or browse a mapped drive path. Browsing for the location only works if you are seated at the server or you are browsing a local directory tree that is identical to the directory tree on the server.
- Workgroup engine users may enter a full path name on a local hard drive, or a mapped drive or UNC name.
In the Data file location box, you must accept the default or browse to the location of the data files. This location can be the location of existing data files if you are setting up an existing database for use with ODBC, or it can be an empty directory if you are creating a new database.
- For Server databases, this must be a full path name on the server-do not enter or browse a mapped drive path. Browsing for the location only works if you are seated at the server or you are browsing a local directory tree that is identical to the directory tree on the server.
- Workgroup engine users may enter a full path name on a local hard drive, or a mapped drive or UNC name.
Click OK to close the Create Database Name window. This returns you to the Create Database Wizard.
- Click Next and go to step 10.
| Prev Setting Up ODBC Database Access |
Contents Up Check for Revisions | Next Setting Up Database Access on a NetWare Server |