![]()
| Prev | User's Guide | Next |
Adding or Creating a Database
To add or create a database, use the Create Database Wizard. Newly created databases are empty and may be populated with tables using the Add Table Wizard described in Adding a Table . (You may also create a database with Table Designer. See Table Designer .)
You also use the Create Database Wizard to create Engine and Client DSNs for pre-existing databases. This allows a database to be accessed using ODBC. For information on how to do this, see Setting Up ODBC Database Access .
Note
If you wish to add a database to a Server engine, you must have administrative rights on the server operating system. If you do not have administrative rights, you will not be permitted to add the database.
- Within PCC, right-click on Databases under the machine on which you want to create the database.
If you do not see the name of the machine where you want to create the database, see Registering or Removing a Server .
- Select New Database from the shortcut menu.
- On a Server engine, you may be prompted to login. If so, supply a user name and password for the server operating system.
The Create Database Wizard starts with the following dialog box:
Figure 3-6 Create Database Wizard Dialog Box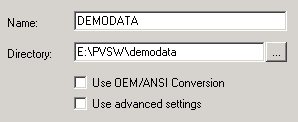
Enter the name of the new database and the location where its files will reside.
When creating a database on a remote machine, remember that the directory entered in this dialog box must be valid as if it was entered on the remote machine. If you are working with a Server engine, you must specify a full path (not a mapped drive) that makes sense on the server. Optionally, you may use UNC paths:
For NetWare systems, use the following path:
\\server\vol1:\path
For Linux systems (when Samba is not used), use the following path:
\\server\$PVSW$\[path on Linux from root '\' dir]
For Windows (or Linux systems with Samba), use the following path:
\\server\sharename\path
Optionally, you may check the Use advanced settings box to specify more details on how the new database should be created, or if you want to create DDFs for existing data files. If this option is selected, an additional dialog box appears later. This option is not required for most database creation tasks. For instructions on using the advanced settings, see Advanced settings procedure .
- Now that all of the required information has been gathered, the Create Database Wizard presents a screen indicating the actions it is about to take. This screen allows you to confirm the settings before they are committed to the engine. Click Finish.
Figure 3-7 Create Database Wizard - Complete Dialog Box
- If no errors have occurred, the wizard indicates success and displays a final dialog box (not shown). Click Close.
Now, if you look in the PCC namespace, a new entry should appear for the database just created. You may have to refresh the list in the Pervasive Control Center for the new database to show. To do this, point the cursor at the menu, click Action, then Refresh.
If you have created a brand new database, where no DDFs or data files existed previously, your new database is empty. No tables or columns have been created. You can use the Create Table Wizard, described in Adding a Table , to define tables and columns.
| Prev Pervasive Control Center Wizards |
Contents Up Check for Revisions | Next Deleting a Database |
 To add or create a database